08 June 2026
Handy Stuff
Tools for Possibilities: issue no. 193
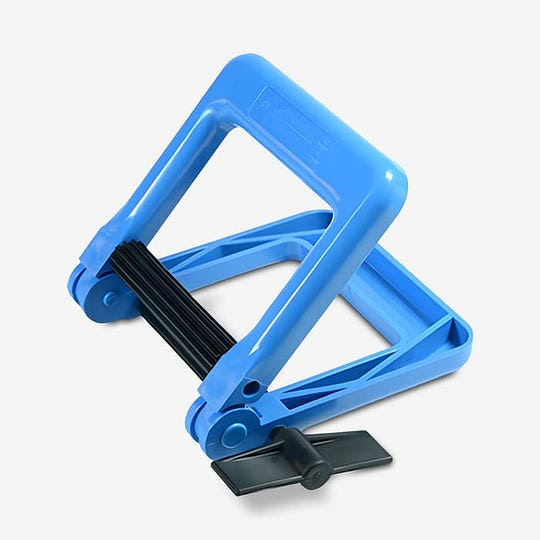
Maximize contents held in tube containers
My new favorite tool is the Tube Wringer, from Gill Mechanical.
From their website: “The Tube-Wringer efficiently squeezes the contents from tubes of caulk, glue, medical compounds, adhesives, and toothpaste. Nearly indestructible, the Tube-Wringer will last a lifetime under normal use and pay for itself in short order.”
In addition to sqeezing every little bit out of just about any tube, the squeezed part is left with a zig-zag texture so future usage doesn’t undo the squeezing. Tubes are left efficiently squeezed, and cool looking. My only problem is that I wish I had more partially-used tubes available because it’s so satisfying to squeeze every last bit out of them. — Sally Rosenthal
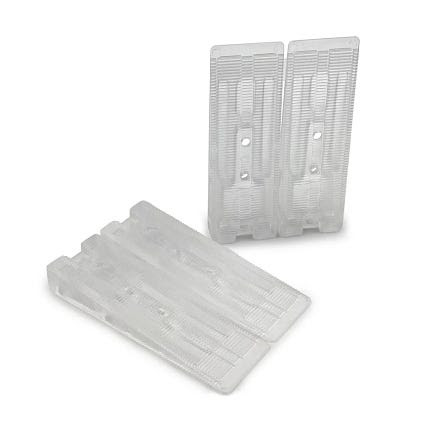
Stabilizing plastic shim
As a grad student, I spend a lot of time working on a laptop in coffee shops and living in old houses. What that means: sitting at notoriously-wobbly cafe tables and shimming furniture on uneven old wood floors. Wobble Wedges are small, clear plastic shims with a ridged surface that are invaluable in both instances. Since they weigh just an ounce or two, I always keep a couple in my computer bag (better than jamming newspaper under a coffee shop table). I usually go to a coffee shop twice a week, sometimes more, and find myself having to use them about 30 percent of the time. Sometimes I forget and leave them behind, but they’re cheap enough it’s no big deal. At home, these also work great because they are clear enough to be almost invisible. They are plenty strong enough for a fully-loaded bookshelf and, in the five years I’ve been using them, I’ve never had one break down or crack. Losing them is another story: I once used some to shim a pedestal sink and never saw them again. But the sink never wobbled either! — Donovan Finn
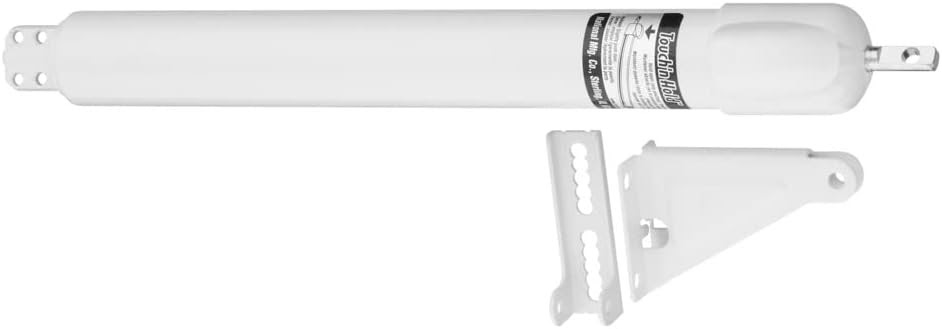
Better door closer
If you have a storm door or screen door, you probably have a pneumatic device that closes it. And the device has a little washer thing that will hold the door open if you put down your bags, and the baby, and let the dog go free while you fiddle it down the bar, so it can jam against the piston. It’s a hassle.
The Touch n’ Hold is a device that makes this a happier moment. The Touch n’ Hold door closer lets you set the door open with a simple tap of your toe or elbow. Then once you’ve got all your stuff inside, just nudge the door (not the thing) open a little more and it will go back into closing mode.
I use it every day, and it always makes me think of Cool Tools. — Thomas T. Ballantine
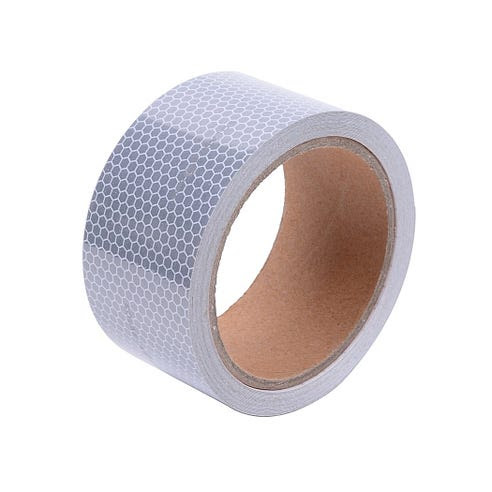
Stick-ons, boosts visibility
We’ve been using 3M’s SOLAS reflective tape for several years. It was designed for the Coast Guard to use on life jackets, so you know it has to be tough and withstand time, bad weather and wet conditions (SOLAS = safety of life at sea). It is a bit expensive, but it is the brightest and most durable stuff I’ve ever found. We use it everywhere and have put in on just about everything: garbage cans, walking sticks, jackets, kayaks, a bicycle, a stroller, a trailer, traffic cones, automobile door jams (so oncoming traffic sees me right away), the trunk of my car (an instant safety device if I get stuck on the side of the road) and the car’s mudguards. The strips on our mudguards — which take a lot of abuse! — are still sticking after more than seven years. Now that I’ve seen how effective it is, I really think it should be a law that all cars come stocked with reflective stripping on door jams. — Jeff Ellis
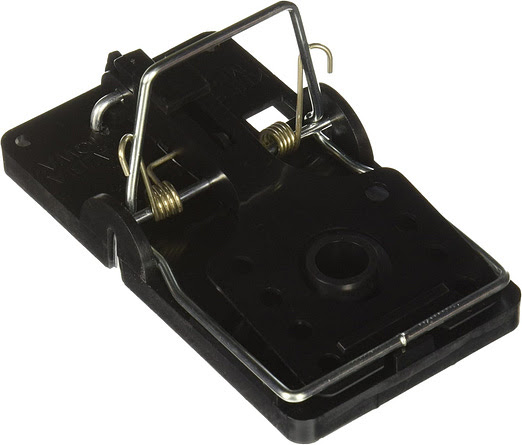
The Best Rat Trap
There are certain less-than-glamorous homesteading chores that I am really good at. Shoveling, doing dishes, and trapping rats. Sigh.
Rats around here are not the loathsome Norwegian variety, but rather wood rats, or pack rats, which look like a big mouse — kinda cute. In the woods, rats build pyramids of twigs 3 feet or so high — rat architecture — always in secluded spots, so you have to be bushwacking to come upon them. In semi-rural areas like mine they cruise human habitations for easy pickins. One year I trapped over 40.
For years I used the standard wooden Victor traps and would put peanut butter in a little piece of plastic (with punched holes), tied to the trigger with baggie ties. Then I started sheet-metal-screwing a 1/2″ copper pipe cap to the trigger, which I filled with peanut butter.
I went through maybe 4 types of other traps until I discovered these. They have a bait cup so the rat has to tug at it, thereby releasing spring—plenty strong enough to ensure fatality.
I’m writing this after getting one last night that had been eluding me for a week. Outwitted by a rat night after night.
Method: I washed 3 traps (getting rid of scent), smooshed some bacon in the cups, surrounded by smears of Skippy peanut butter — mwah!
And whack! Mighty hunter. —Lloyd Kahn
Once a week we’ll send out a page from Cool Tools: A Catalog of Possibilities. The tools might be outdated or obsolete, and the links to them may or may not work. We present these vintage recommendations as is because the possibilities they inspire are new. Sign up here to get Tools for Possibilities a week early in your inbox.
06/8/2607 June 2026
At‑home writing retreat / Surprising podcasts / Tiny camera
Recomendo - issue #517
At‑home writing retreat
I copied this essay’s idea of an at‑home writing retreat by creating a loose schedule of deep‑work, time‑blocked writing between breaks for reading, meditating, walking my dog, lunch, and body care. What would have been a regular, aimless Saturday of half‑finished chores and movies turned into a day that felt both relaxing and genuinely productive at the same time. It surprised me how intentionally breaking my normal rhythm, even inside my own house, could leave me feeling like I’d been somewhere new mentally and physically. — CD
Tiny retro keychain camera
The Kodak Charmera is a thumb-sized digital camera that clips onto your keychain and shoots gloriously lo-fi 1.6-megapixel photos and video. My daughter has been taking amazing shots with it — the grainy, slightly washed-out images have a nostalgic, early-2000s digicam vibe that mocks the clinical perfection of phone cameras. One catch: without a microSD card, it only stores two photos, so buy a cheap card to make it truly useful. Young people are embracing these tiny cameras, maybe out of childhood nostalgia. Check out the r/toycameras subreddit for inspiring photos from the Charmera and other little cameras. — MF
Surprising podcasts
Two of my favorite new podcasts are produced by co-authors of one of the most notable books of last year, Abundance. The book argues for dynamic governance and a liberalism that builds stuff. Each author now has their own podcast. The Ezra Klein Show is in your standard interview format, but with an unexpected range of subjects, all cast through Klein’s sharp mind and extensive background. The conversations are reliably good. Derek Thompson’s Plain English show is a scripted narrative that researches interesting questions. His episodes are more like an audible magazine with more than one interviewee. I rate my podcasts on how often they surprise me, and Plain English is usually surprising. — KK
Disposable baby bibs
A common parenting challenge when traveling or visiting with small children: a bib is too bulky to carry around, but meals without it are a mess. First world solution: disposable bibs. Light, cheap, does the job, toss when done. $7 for 20. — KK
Private visual universe
Cosmos is a visual search engine like Pinterest, except it’s ad‑free (right now), which makes it a quieter, calmer place to gather and collect thematic images. There are no likes or comments, so it feels less like social media and more like a private gallery for drafting up mood boards and visual worlds. — CD
A rollicking Viking saga
My father kept recommending Frans G. Bengtsson’s novel The Long Ships to me, but I kept putting it off. As soon as I started reading it, I was enthralled. This 1941 Swedish classic follows Red Orm, a Danish boy abducted by Vikings, through galley slavery, Moorish Spain, battles in England, and treasure hunts along Russian rivers. It’s funny, exciting, and endlessly inventive. If you liked Game of Thrones, Edgar Rice Burroughs, or Jack Vance, you’ll probably love it too. Novelist Michael Chabon, who wrote the introduction, says he’s only ever met three other people who knew the book — and all of them, like him, “loved it immoderately.” — MF
Sign up here to get Recomendo a week early in your inbox.
06/7/2605 June 2026
Book Freak #212: Prometheus Rising
Robert Anton Wilson on Liberating Your Mind from Its Own Traps
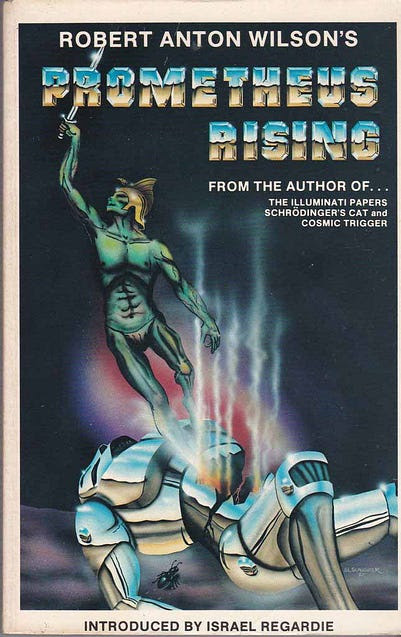
I read Robert Anton Wilson’s Prometheus Rising when I was in my early 20s, and it has stuck with me ever since (I’ve re-read it several times). It’s a manual for understanding how your mind got programmed and how to reprogram it, using Timothy Leary’s eight-circuit model of the mind, which maps consciousness across eight levels, from the most basic survival reflexes and territorial emotions up through symbolic reasoning, and then into higher circuits — neurosomatic bliss, collective unconscious, metaprogramming, and beyond. Wilson uses this framework as a ladder: each circuit has its own imprints, triggers, and exercises for waking it up.
Core Principles
1. Whatever the Thinker Thinks, the Prover Proves
Your mind has two parts: a Thinker that creates beliefs and a Prover that finds evidence to support them. If you think the world is hostile, your Prover will find endless proof. If you think people are kind, your Prover finds that too. This is why people with opposite beliefs both feel completely certain — their Provers are working perfectly. Understanding this mechanism is the first step to freedom.
2. You Live in a Reality Tunnel
Each of us inhabits a unique “tunnel-reality” constructed from our neurological wiring, cultural conditioning, and personal experiences. We don’t see the world as it is, because that’s impossible. We see our model of it. Communication fails because we assume others share our tunnel.
3. Society Is a Brainwashing Machine
Human society conditions us to walk with a perpetual mental crouch, using only a fraction of our potential. Most of our limitations aren’t inherent — they’re imprinted through culture, language, and social expectations. We’ve been programmed to believe our small selves are all there is. Unleashing our full mental stature is what brain-change work is all about.
4. The Nervous System Can Be Reprogrammed
Your brain isn’t fixed. Through deliberate exercises and practices, you can rewrite your mental software, escape old imprints, and access circuits of consciousness you didn’t know you had. Wilson provides exercises at the end of every chapter because reading about change isn’t enough — you have to practice it.
Try It Now
- For one week, assume the world is conspiring to help you. Notice how your Prover finds evidence for this belief.
- Identify a strong opinion you hold. Spend 15 minutes deliberately arguing the opposite position to yourself, as convincingly as possible.
- Notice when you say “is” statements (”He is lazy,” “That is wrong”). Rephrase them: “He seems lazy to me” or “I perceive that as wrong.” Feel how this loosens your certainty.
- Pick someone whose worldview differs radically from yours. Instead of dismissing them, try to understand the reality tunnel that makes their beliefs make sense to them.
Quote
“Whatever the Thinker thinks, the Prover will prove.”
Book Freak is published by Cool Tools Lab, a small company of three people. We also run Recomendo, the Cool Tools website, a YouTube channel and podcast, and other newsletters, including Recomendo Deals, Gar’s Tips & Tools, Nomadico, What’s in my NOW?, Tools for Possibilities, Books That Belong On Paper, and Book Freak.
06/5/2604 June 2026
Rocking Speaker/Don’t Work in Bali/Airbnb and Housing
Nomadico issue #209
A Portable Speaker That Rocks
I have tried at least 20 small Bluetooth speakers over the years. The small size usually means major sacrifices. They’ll normally handle electronic dance music and synth pop just fine, but have trouble providing good fidelity for rap and rock. I finally found one I could crank up to 11 with the Fender X ROCKSTER Go 2 by Teufel. Yes Fender the guitar/amp company. It handled everything well, including one of the best riff rock albums ever: Electric by The Cult. The neighbors could hear it and the wife was shouting, “Turn that down!” It’s waterproof, shock-proof, and has a crazy long 28-hour battery life. It weighs a pound and a half (734 grams) and is 8.4 inches wide, so it’s best packed when checking a bag, but you’ll be party ready on the other side.
No Remote Work or Freebies in Bali
You can add something new to the very long list of reasons to avoid Bali. In one of the strangest government decrees we’ve seen yet, Bali is enforcing a policy that any kind of commercial activity done on their island requires a work visa. That means any kind of compensation coming from anywhere in the world, in any form, is prohibited. They’ve been cracking down on “influencers” because those people are the most visible, but they’ve said this will also apply to remote tech workers and people receiving freebies while on site. Does that mean you could be fined if you post a photo of your free cocktail from a hosted event? Or that trade show water bottle you got while attending a convention? Or if you step into a co-working space and open a laptop? The way it reads now, yes.
Thailand Halves the Visa on Arrival Time
Thailand’s government is almost as mercurial as Bali’s, changing their visa policies constantly to reflect their love-hate relationship with digital nomads. After a few bad apples opened physical businesses while on a tourist visa and the extra days didn’t move the needle on tourism arrivals, the government is turning back the calendar. At a date not determined yet, the tourist visa on demand will only be good for 30 days instead of 60. This could change or get pushed back, but for now plan accordingly. If it goes through, you’ll have to visit an immigration office to extend your stay to two months instead of one (and approval is not guaranteed).
The Airbnb Housing Distraction
Often when governments try to solve a problem, the easy solution they reach for is the most ineffective. I wrote before about the utter failure of New York City’s Airbnb ban, which only succeeded in enriching hotel companies, not helping local renters. This great article breaks down why that failed and why similar measures in Spain will too, while Tokyo and Austin have managed to decrease average rent prices by going after a lasting solution instead. The real solution is harder, but has far more impact: making it easier to build new housing.
A weekly newsletter with four quick bites, edited by Tim Leffel, author of A Better Life for Half the Price and The World’s Cheapest Destinations. See past editions here, where your like-minded friends can subscribe and join you.
06/4/2603 June 2026
What’s in my NOW? — Pavel Guzhikov
issue #256

Russian-born, London-based. Three kids, a few companies, an adventure bike, two restless legs and a habit of chasing ideas, opportunities, and adventures across continents and B-roads.
LINKS:
NEWSLETTER:
Journey of a quiet changemaker Stories about pain, gain and lessons learned from entrepreneurship, tech, social work and living with eyes open.By Pavel Guzhikov |
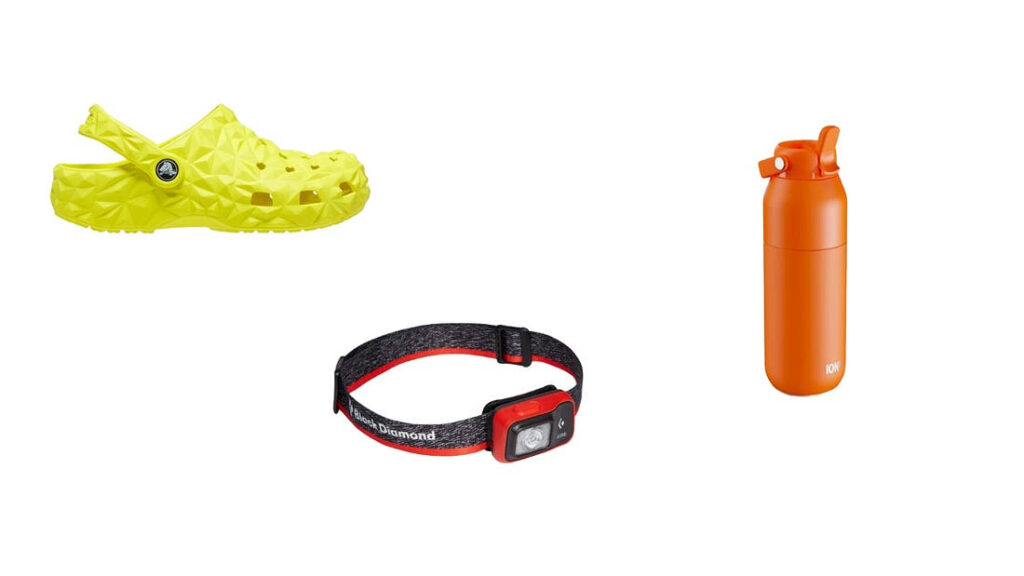
PHYSICAL
- Crocs Geometric Clog — I always thought Crocs are lame and uncomfortable, until my friend some day told me he is sexy enough to wear crocs all the time. Then I randomly bought this geometric one and fell in love. I go to gym, shop, sometimes office and basically anywhere where something more is not expected by circumstances. Really comfy and versatile.
- Black Diamond Astro — bought a couple of years ago in Tashkent, Uzbekistan for mountain hiking and camping, but had a new like at my home and daily life in London, UK. I use it in so many situations – to keep my hair up, to read books, to cook in the kitchen, to play with kids, to run. It is a thing which makes me see everything more clearly in all possible ways.
- Ion8 Primo 720ml water bottle — I am very British-local-manufacturing-patriotic which I try to write about in Substack by the way. I used Camelbak bottles a lot, but switching to ion8 made me feel the difference. Everything is perfect here up to the nozzle. It is beautiful, useful, comfortable and makes me drink more and more with more pleasure.
DIGITAL
- Endel — even in years when creating music is a click away I still love and feel Endel is doing a great job for me and my brain. It relaxes me, soothes, focuses, energises… and so on. It is like ML but without feedback loops. Don’t know, it just works amazing for me.
- Knowledge Project — if I have to consume only one source of information, this would be it. Shane does a great job for years asking great questions to interesting and not always obvious people. Signal in the world of noise. Ideas to think about. Thought provoking.
INVISIBLE
“Just keep livin’” — mentioned by Matthew McConaughey in his first book is an internal engine that was always in me to keep doing things often even without thinking why, what for or how. For me it is an idea for both “stand up and play again” and that even “empty” days are fine to be out there.
Sign up here to get What’s in my NOW? a week early in your inbox.
06/3/2602 June 2026
Unflattening / Exploring Calvin and Hobbes
Issue No. 120
A GRAPHIC DISSERTATION THAT ARGUES FOR THE POWER OF IMAGES OVER TEXT AS A WAY TO TEACH
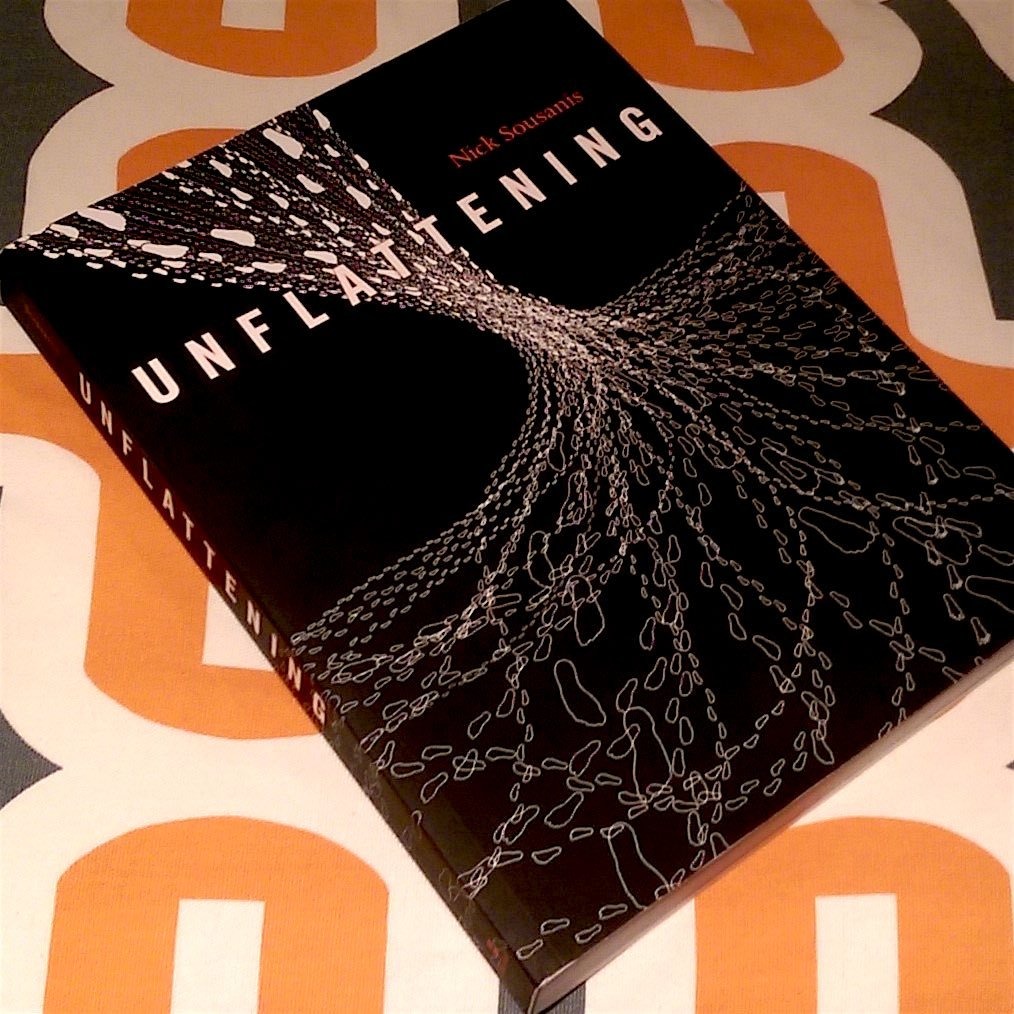
Unflattening
by Nick Sousanis
Harvard University Press
2015, 208 pages, 7.5 x 10.2 x 1 inches
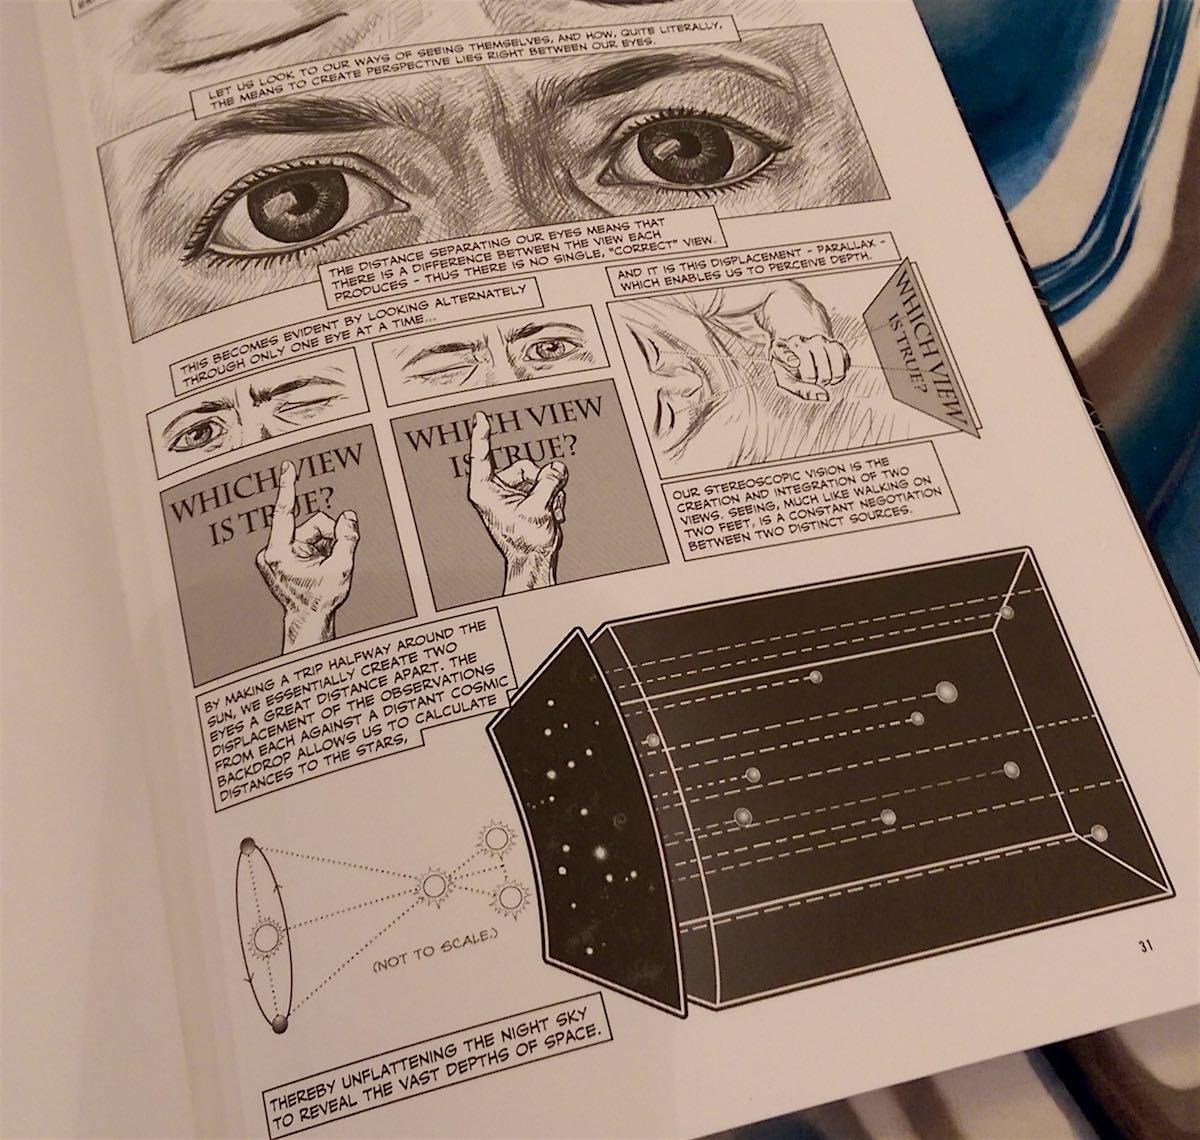
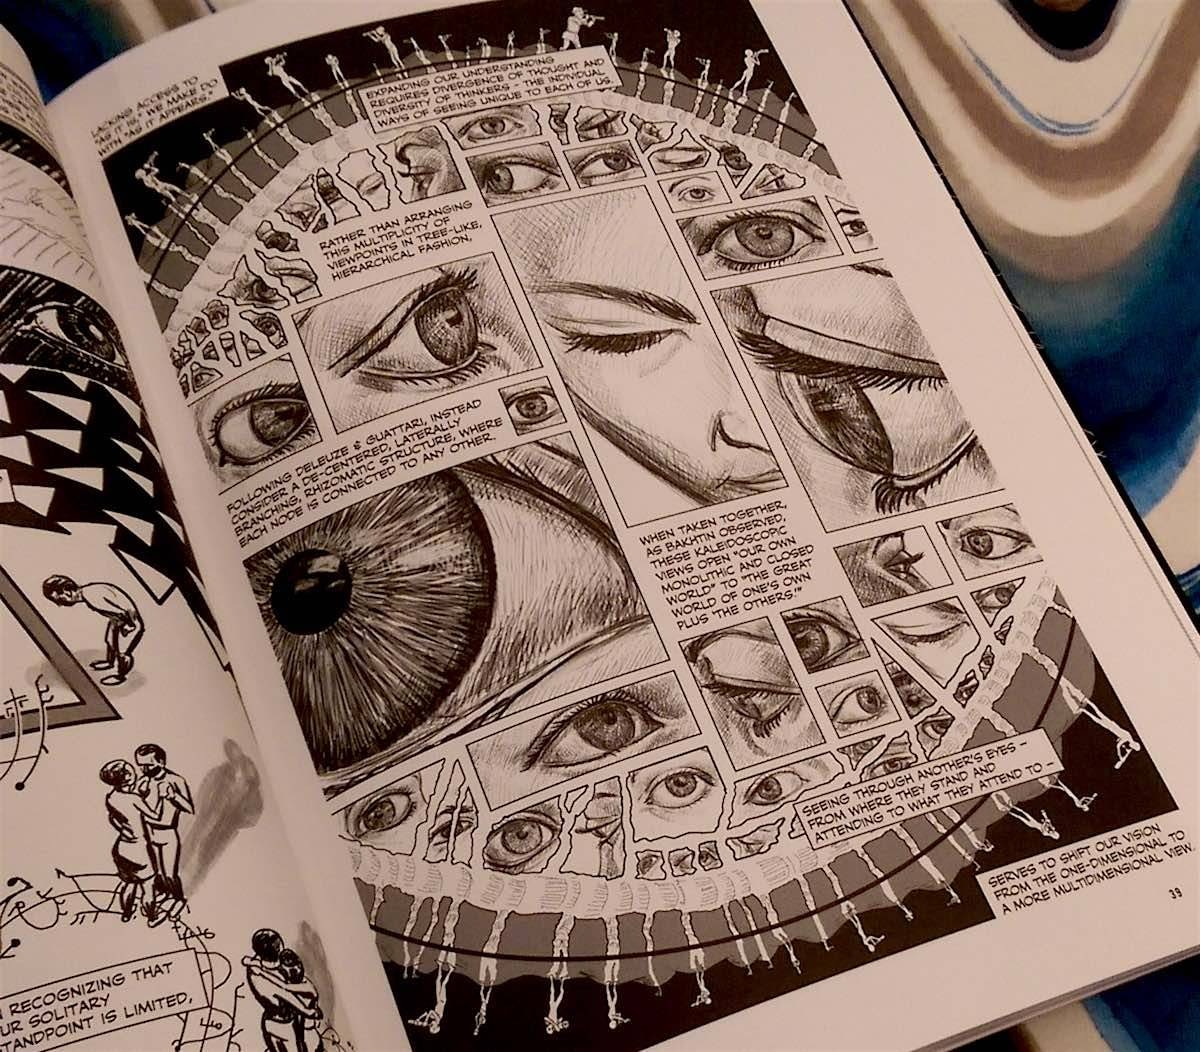
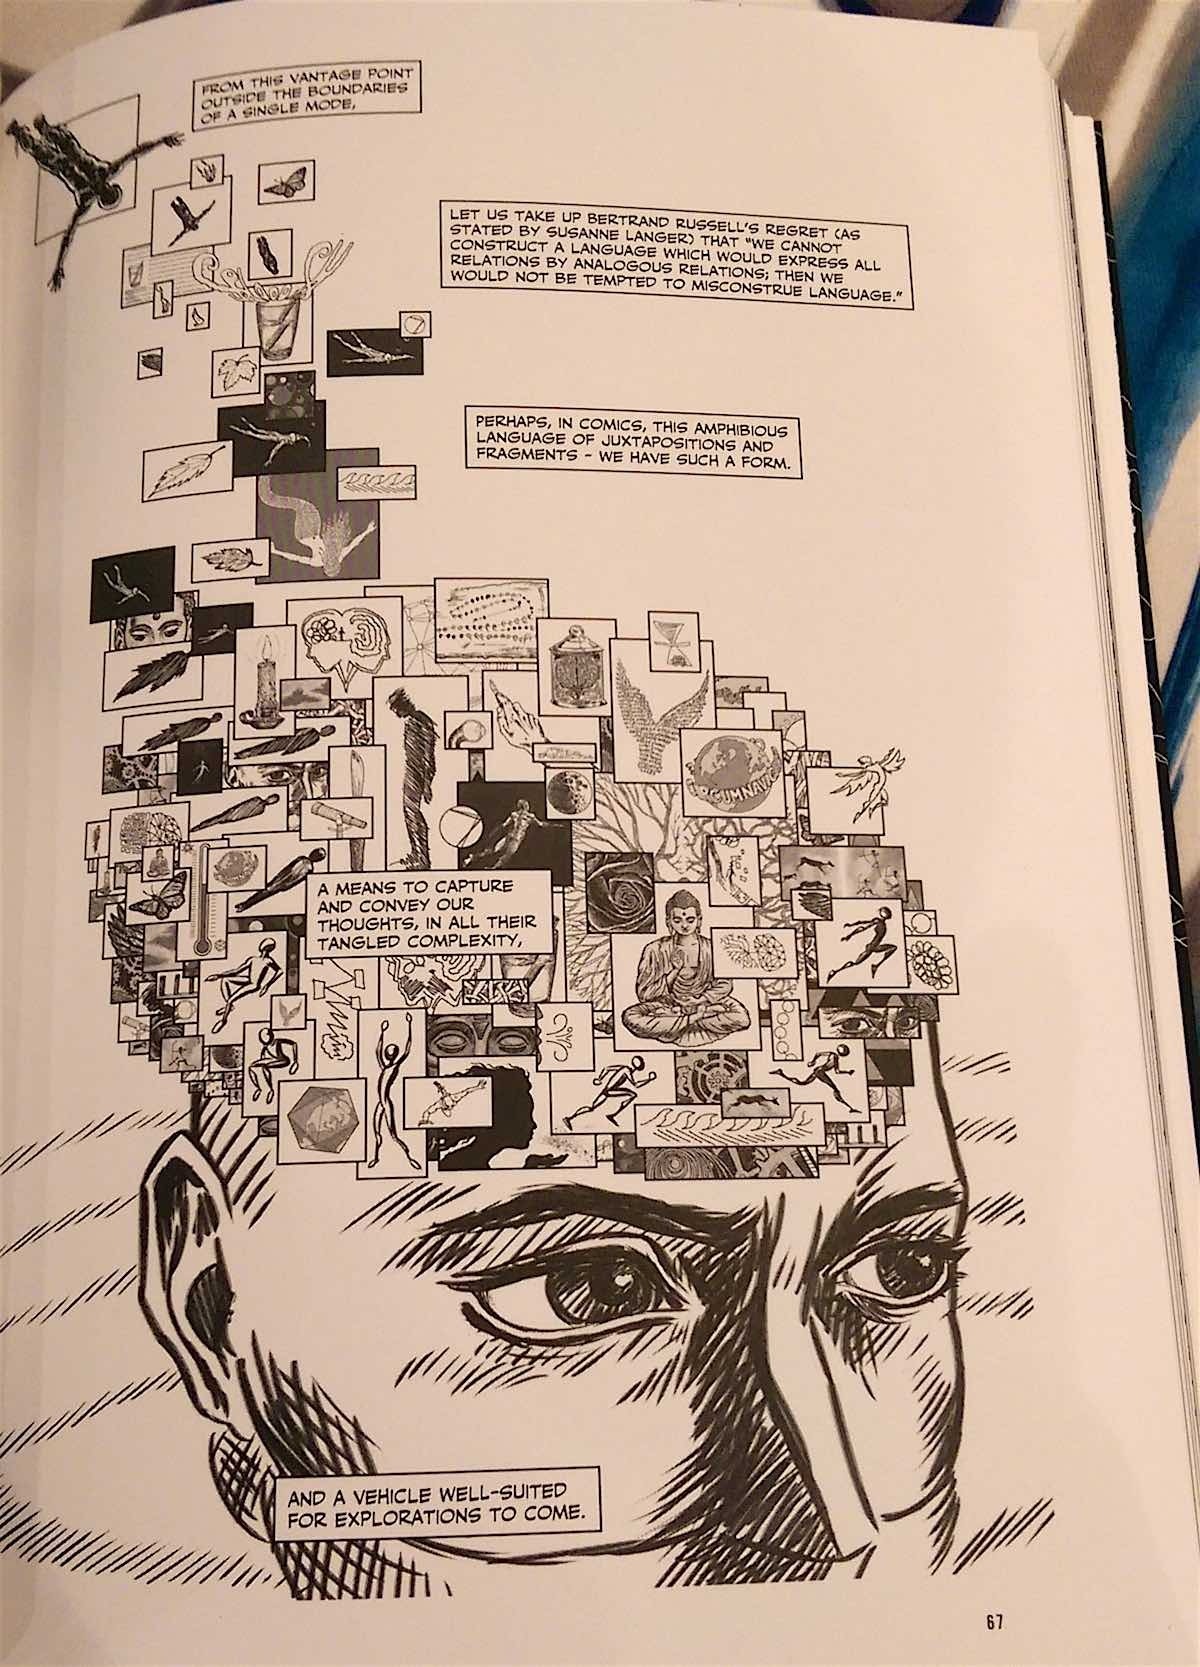
It is remarkable how much we learn in our youth and how fast we learn it. It is a pace that really cannot sustain itself as we age, though we might try to continue to learn as though we were young. In my youth, the newspaper seemed a vast swarm of text and a few images that encircled a hidden prize: the funnies. Comics, in youth, are acceptable, but as we age we regard them more as juvenile diversions. Over time, the picture book gives way to the novel. The non-fiction works in the form of text books and scholarly journals are tools to educate us. Finally, should we pursue learning down the institutional path long enough, we encounter doctoral theses with their many and myriad intertextual references. It is a long-standing joke among academics that it is rare that the thesis they slave over for four or more years ever actually gets read.
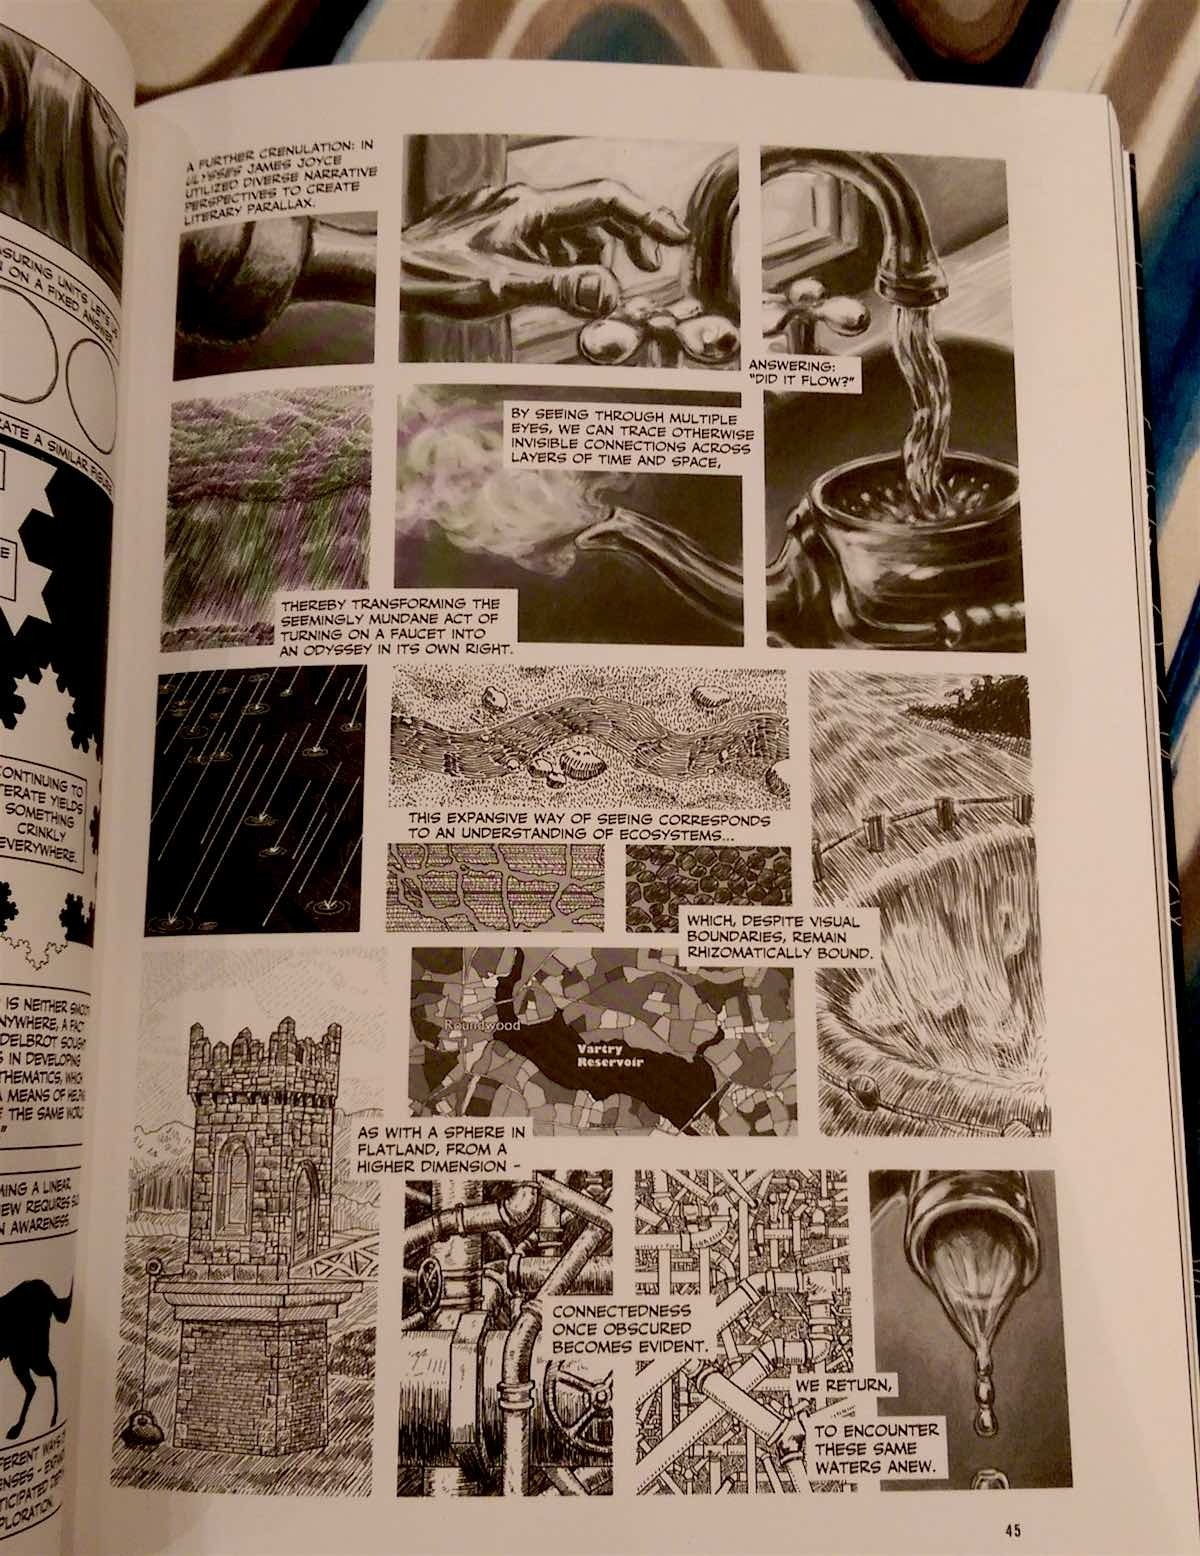
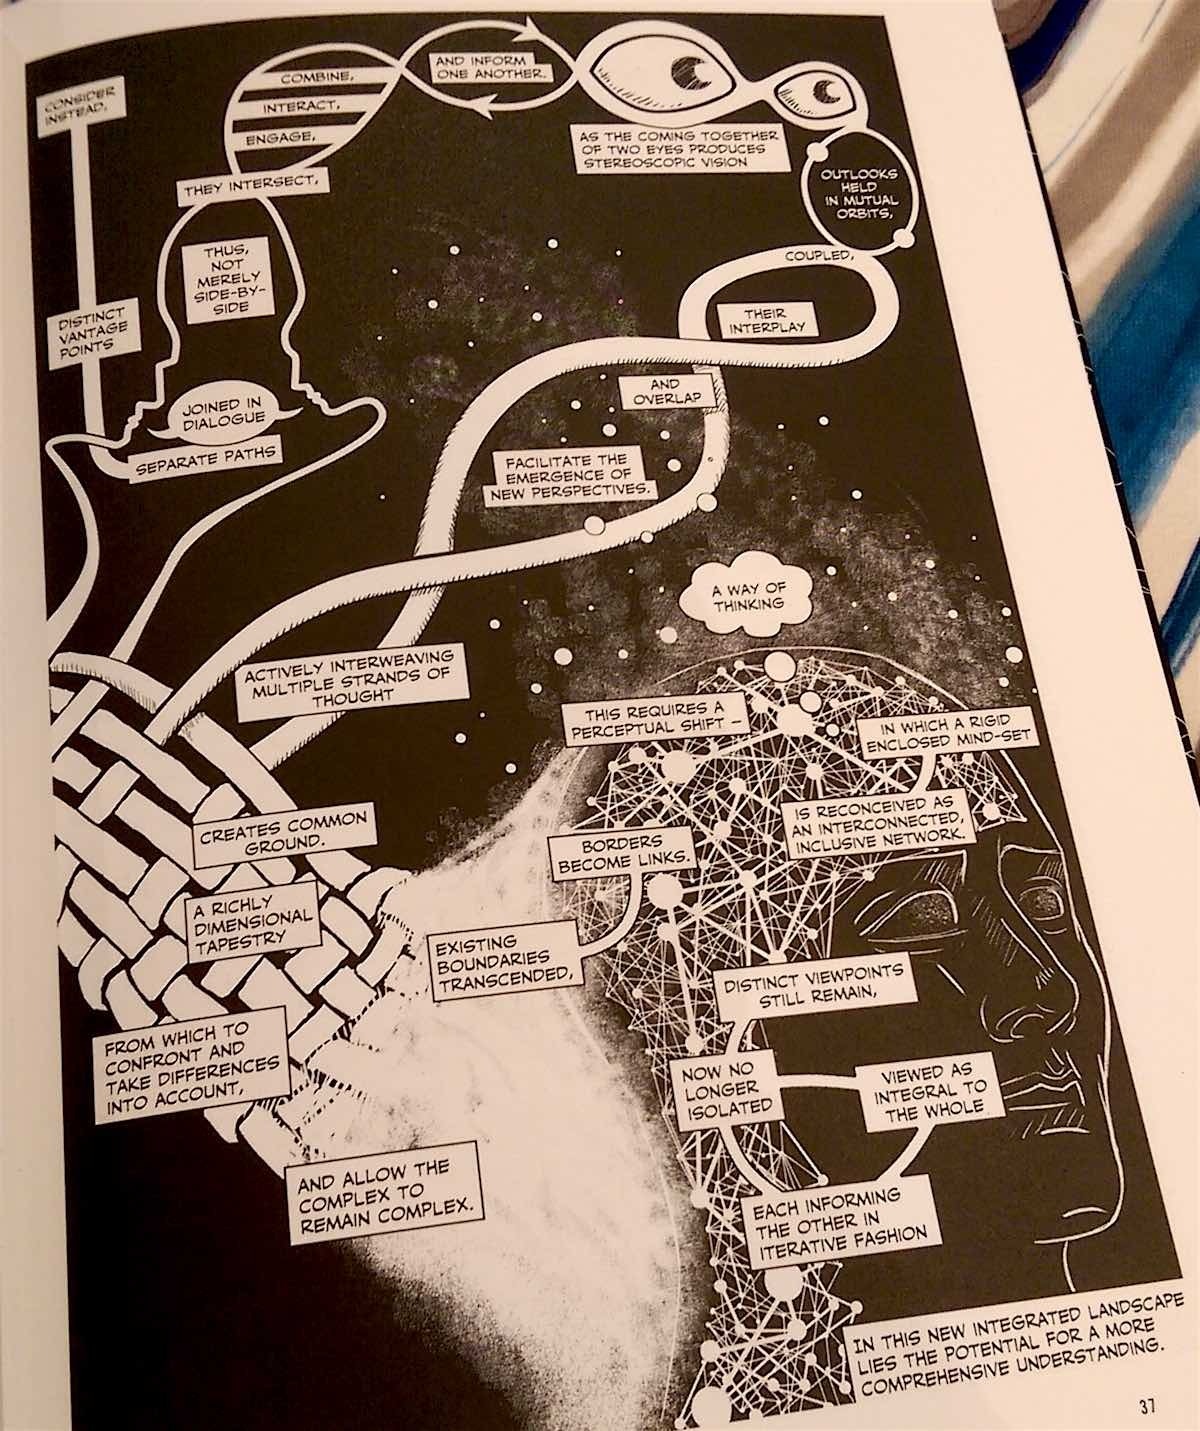
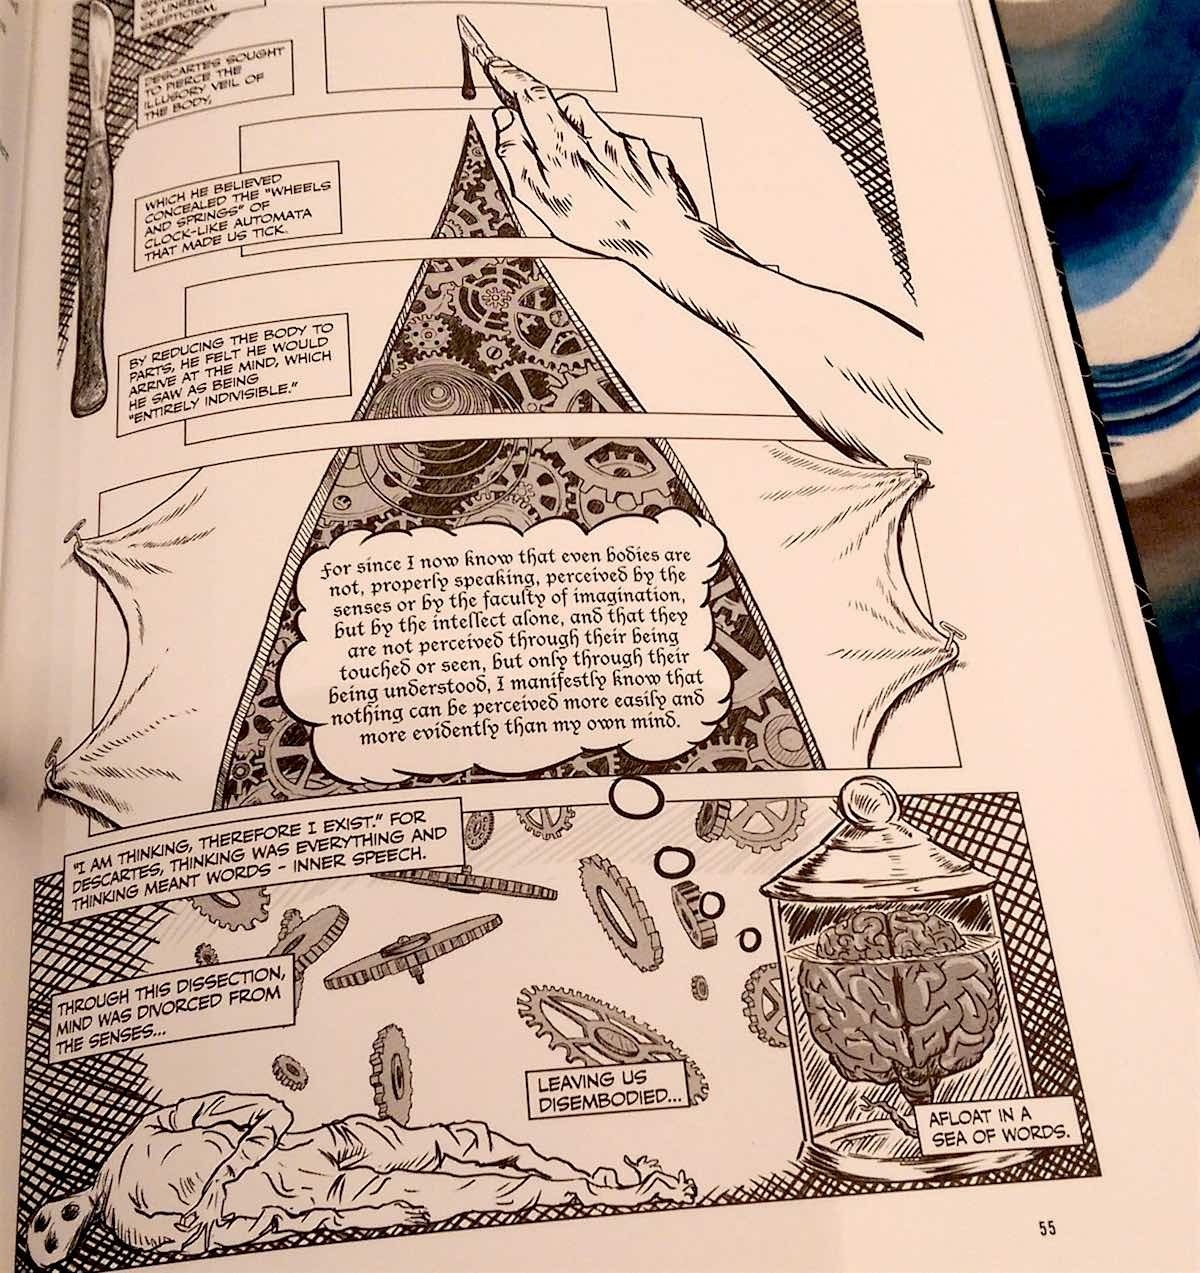
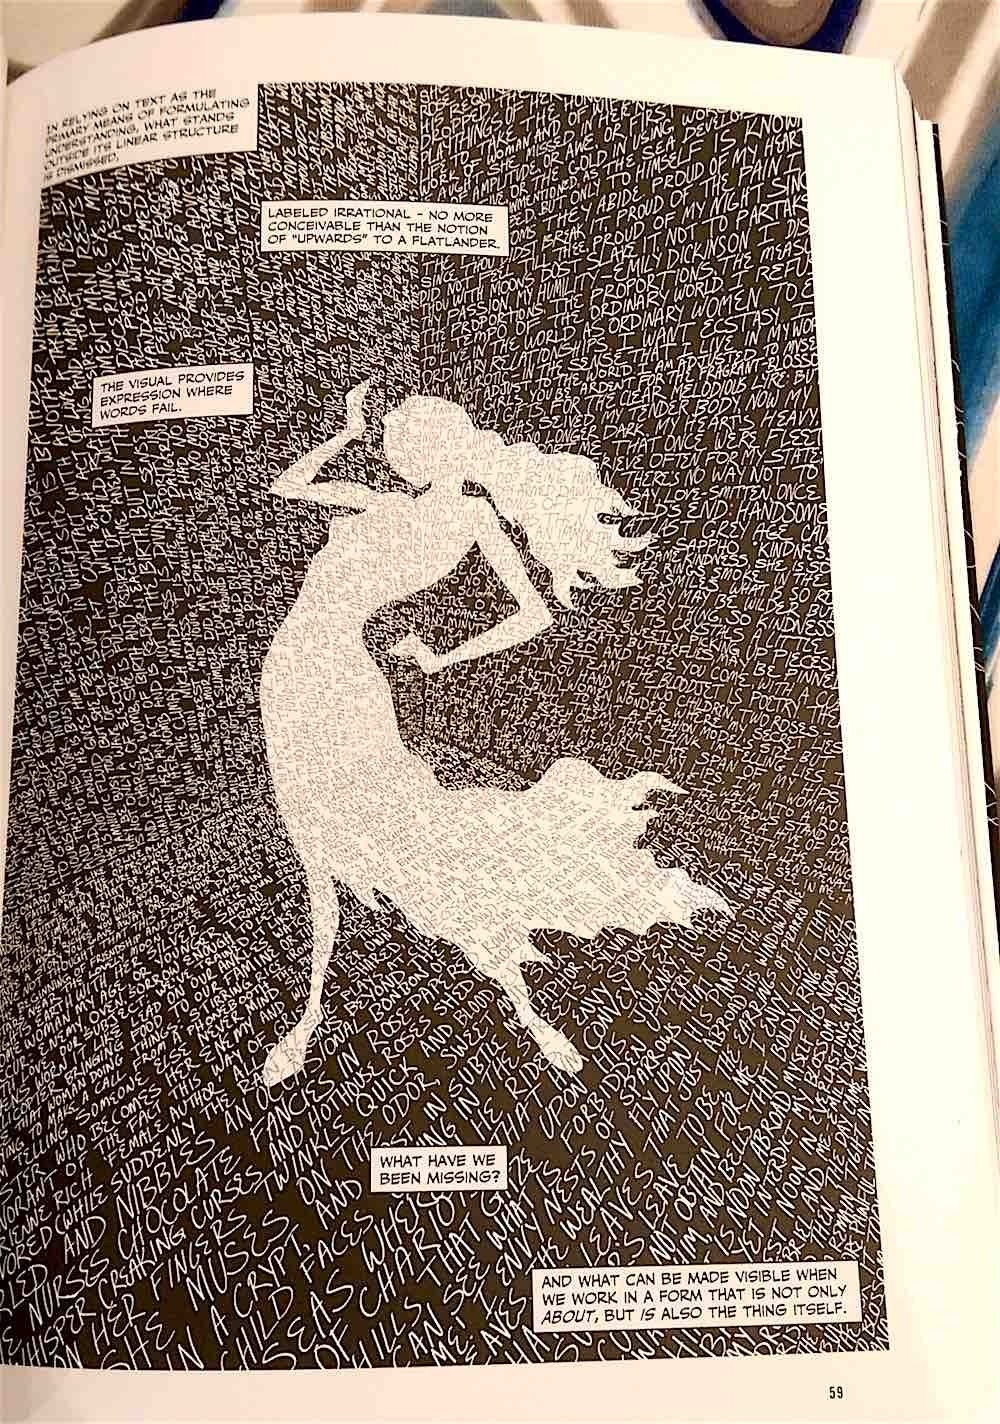
Nick Sousanis, with his doctoral thesis Unflattening, is a poignant departure from any trend of dissertations written for the sake of being written. More than that, it is meant to be more than a read work. It is an experiential work that asks the reader to not just read, but rather to participate in learning to appreciate imagery on equal terms with orderly lines of written text. This is a dissertation written in comic book format that argues for the power of that medium. One might think about the adage concerning the worth of pictures and thousands of words, and that does come up in the work itself, but this is something more than a trite saying. It is a masterful reinterpretation of how we read and learn, and how our world can be captured and conveyed to our fellows. It dismantles the rigid presumptions we have regarding the inherent value of the written word – especially scholarly writing. It champions the comic, for “while the image is, the text is always about.” Indeed, it is brilliantly argued throughout that “the visual provides expression where words fail.”
The title, Unflattening, refers to Edwin A. Abbott’s novella Flatland (1884), about a dystopian flatland of two dimensional objects, where a coin would not be seen by others for its circular shape, but rather would be seen edge-on as just a line obscuring the horizon. This is a “linelander,” and all linelanders see each other this way. A square of three dimensions frees the coin-shaped object by peeling it from the flat surface so that it might see its brethren and world from above – from the third dimension, just as we would look down upon a page in a geometry textbook
Sousanis, similarly, wishes to peel us away from the linear predominance of the textual world where word follows word follows word. He comes from a background in comics, graphic novels, or whatever phrase you would use to describe his art. Just as his square peels away the coin from lineland to reveal it to be flatland, so too Sousanis convinces us, by both text and deed, of the power of comics. His text is often sparse and pared down to its most necessary elements, but the accompanying visuals draw the eye along and serve as an obvious example that reinforces the sometimes vague text. The deed is the image, for it is the more obvious representation of our lived world, while the text can only describe it. This may all seem obvious, but Sousanis brings to bear so many examples and graphical displays to reinforce his line of argument, that the journey through this work is quite remarkable. Moreover, his endnotes at the back serve not only to acknowledge his textual sources, but also to draw attention to and explain his visual inspirations. Those images that so often sit confined within frames within museum galleries or as a ghettoized section of glossy pages in the middle of an art book, they are given life and agency by Sousanis’ deploying of them as allies to his words.
Certainly, it is almost with chagrin that one must only write about such a work when it argues so convincingly that mere text is limited in its conveying of full meaning. It is some solace that the accompanying images from Sousanis’ work will allow readers of this review to gain greater insight in the majesty of his pairing of imagery and text. This is a thinking person’s book and it is most definitely academic, but it is also surprisingly accessible. It draws upon – and draws – so many disciplines and so many real-world instances, that anyone and everyone will find it illuminating. So profound are many of these moments of illumination that they go a long way to rejuvenating our desire to see the world anew, from a child’s eyes once more. – Stephen Webb.
FOR FANS INTERESTED IN THE HISTORY AND INSPIRATION BEHIND A BOY AND HIS TIGER
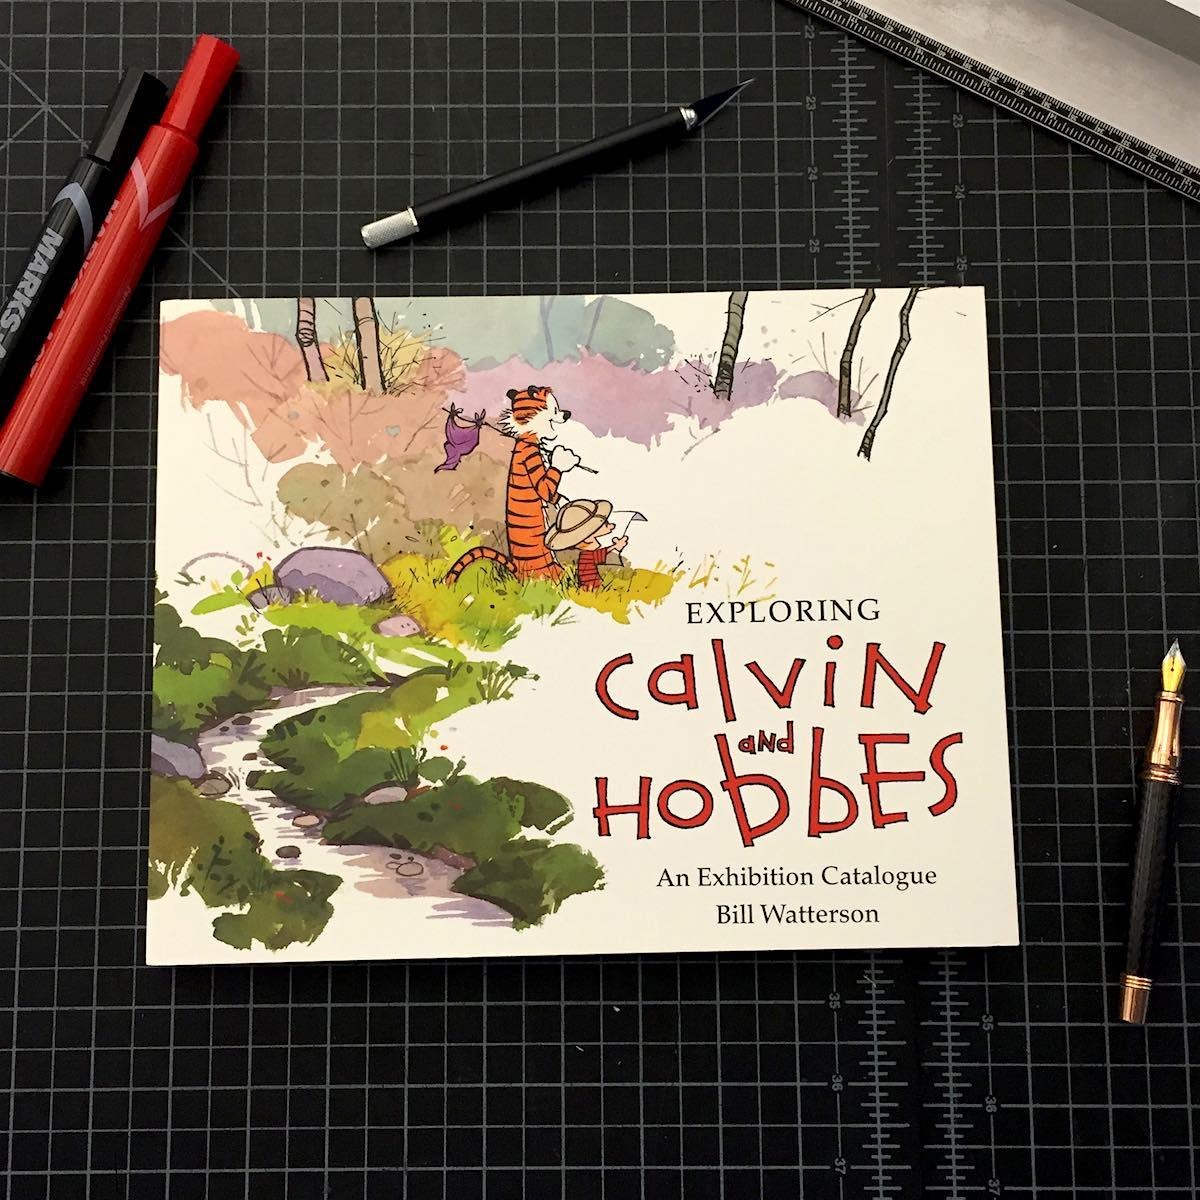
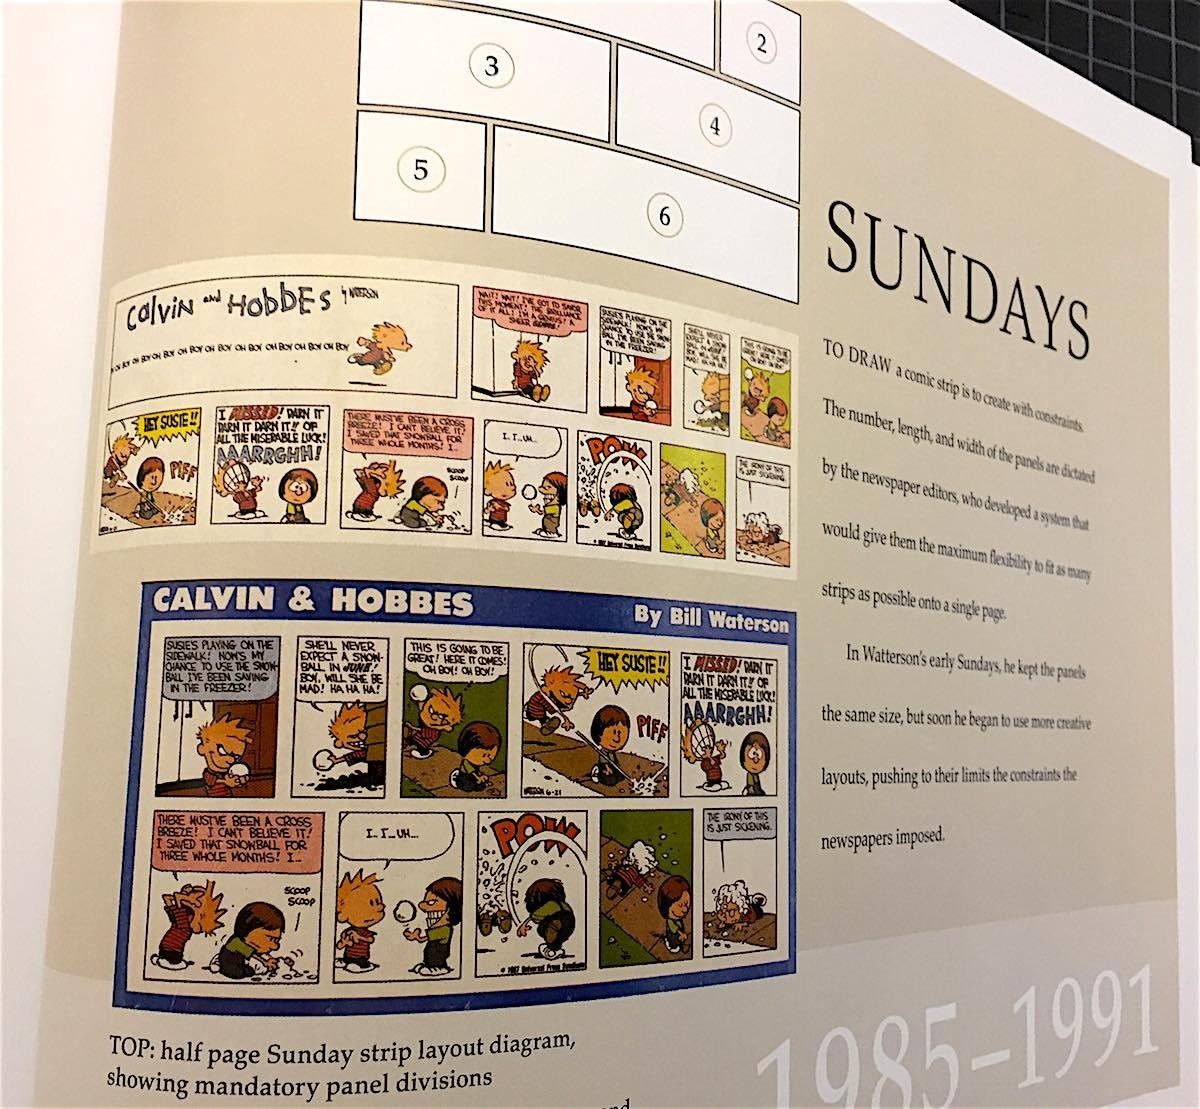
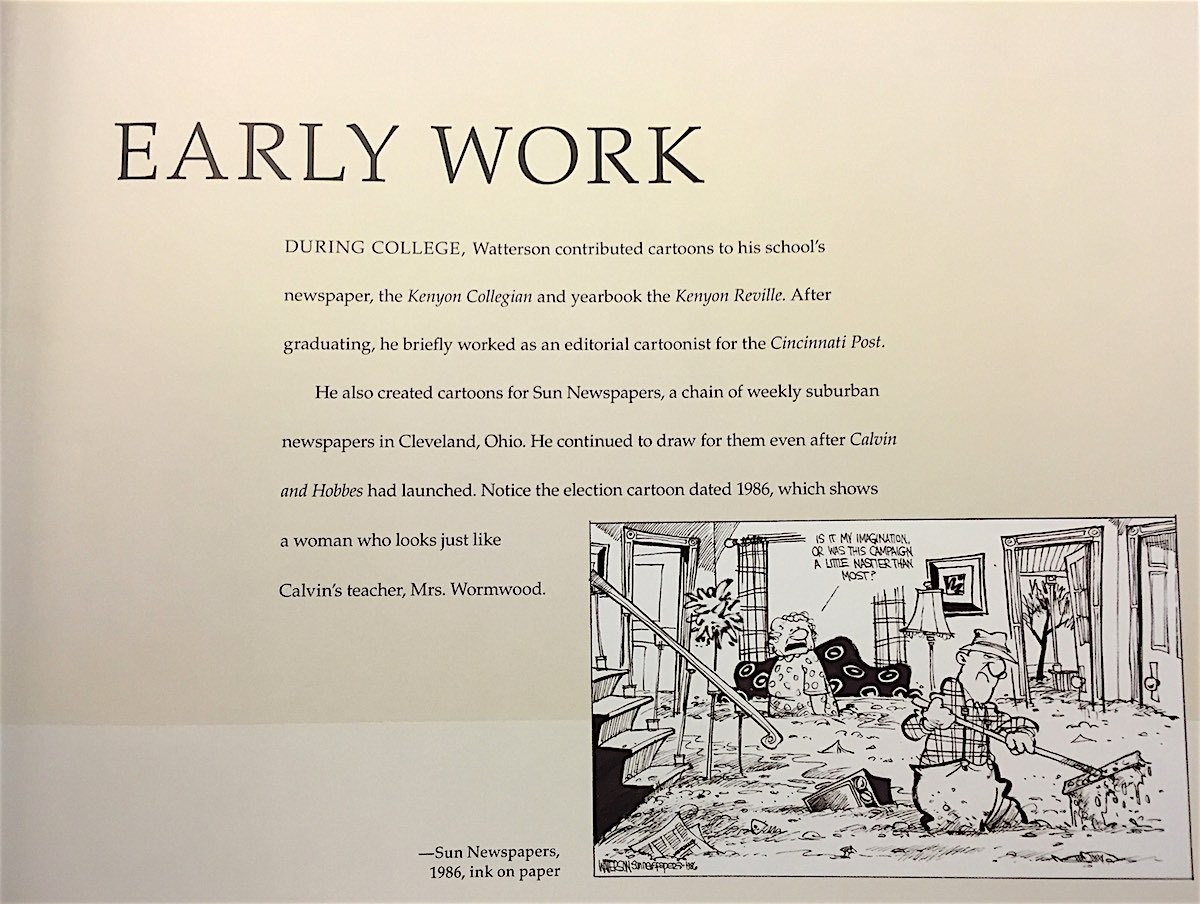
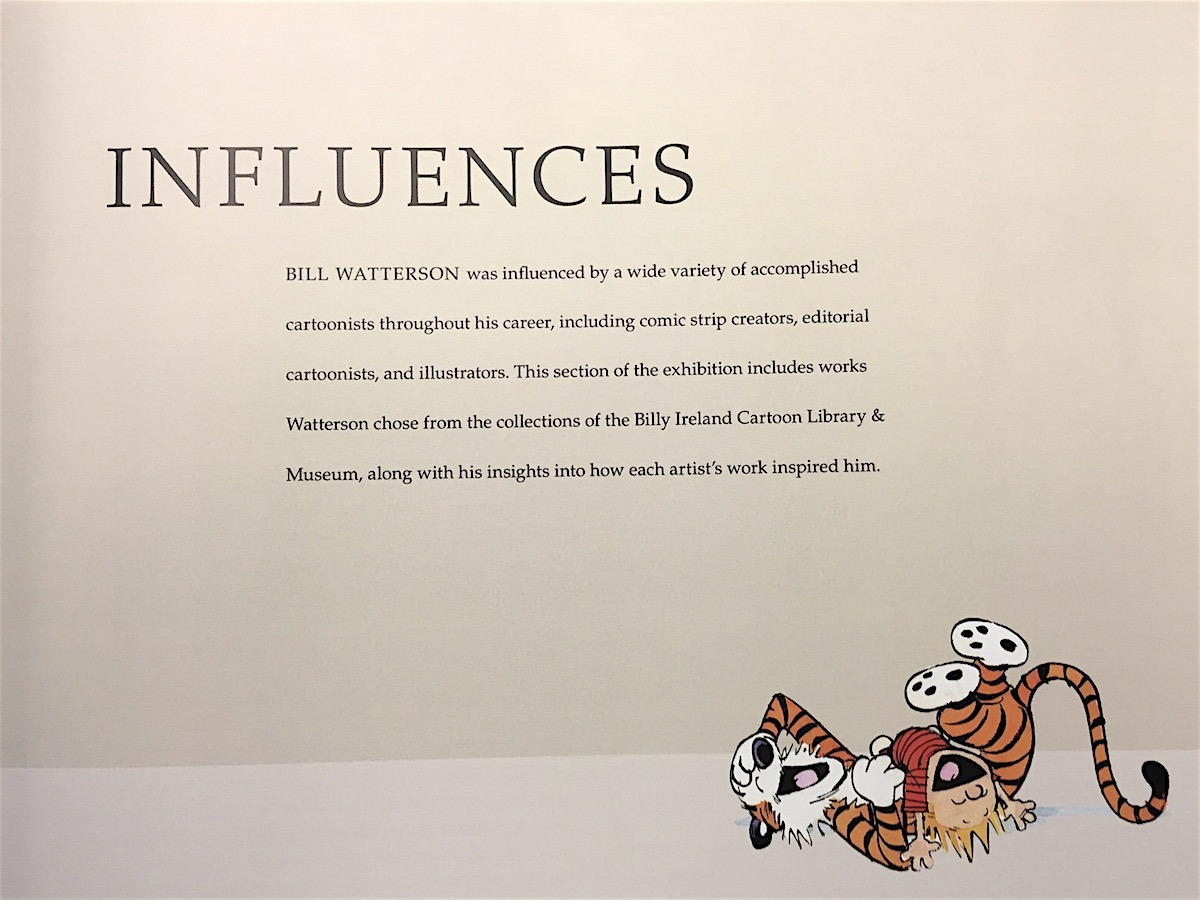
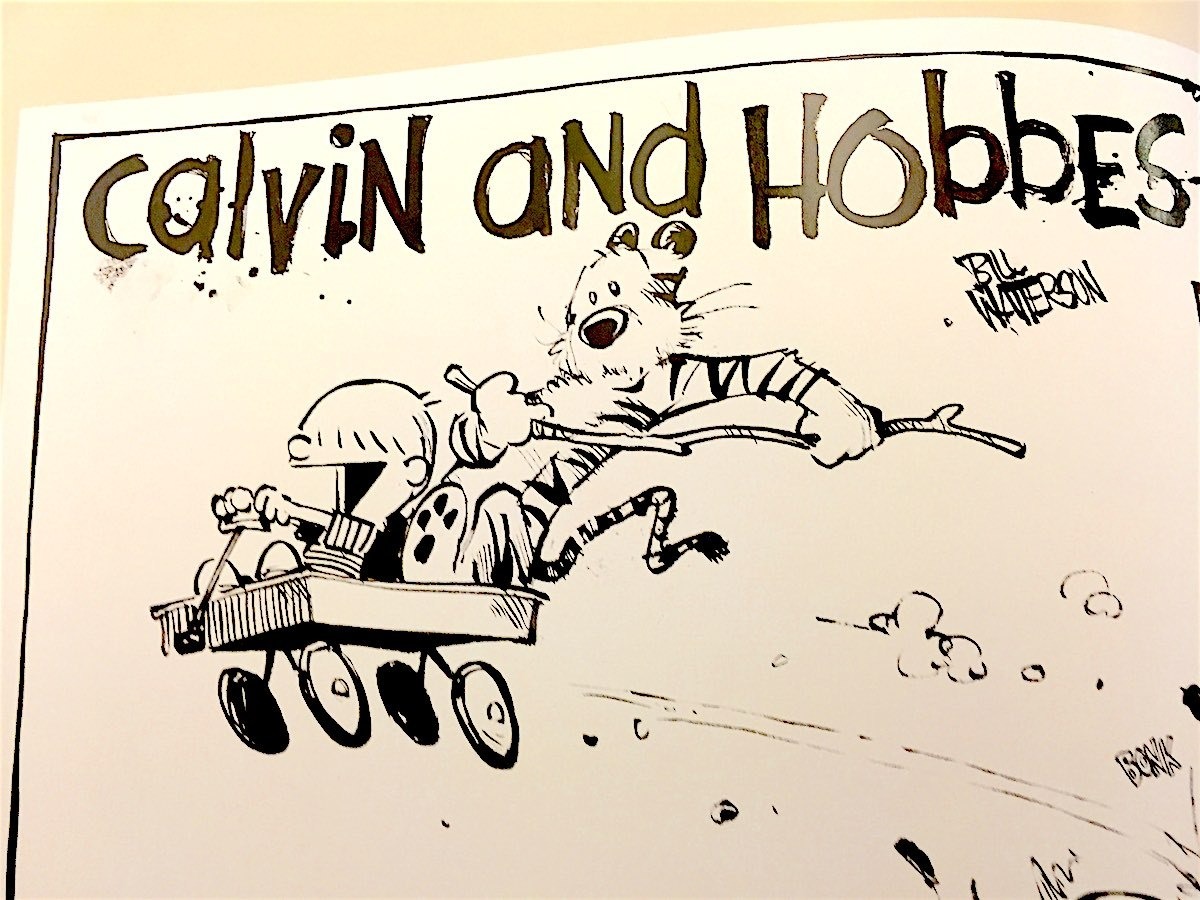

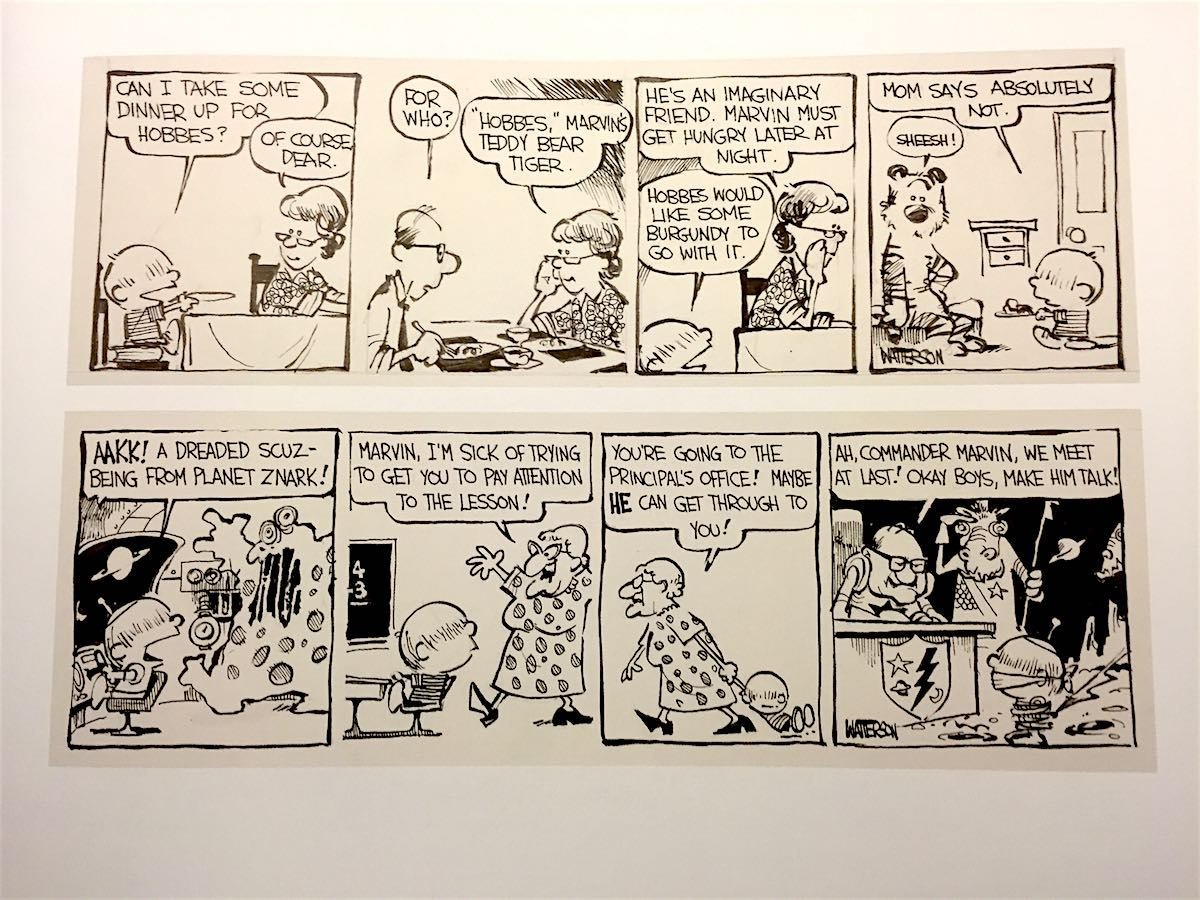
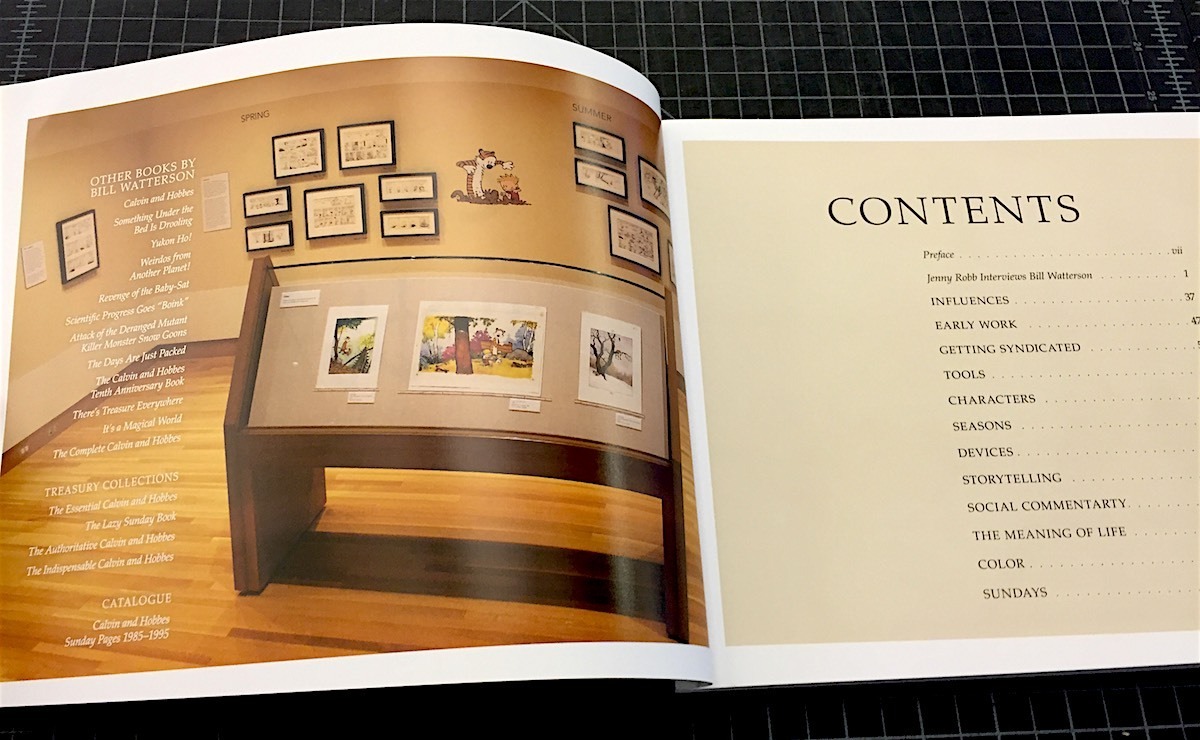
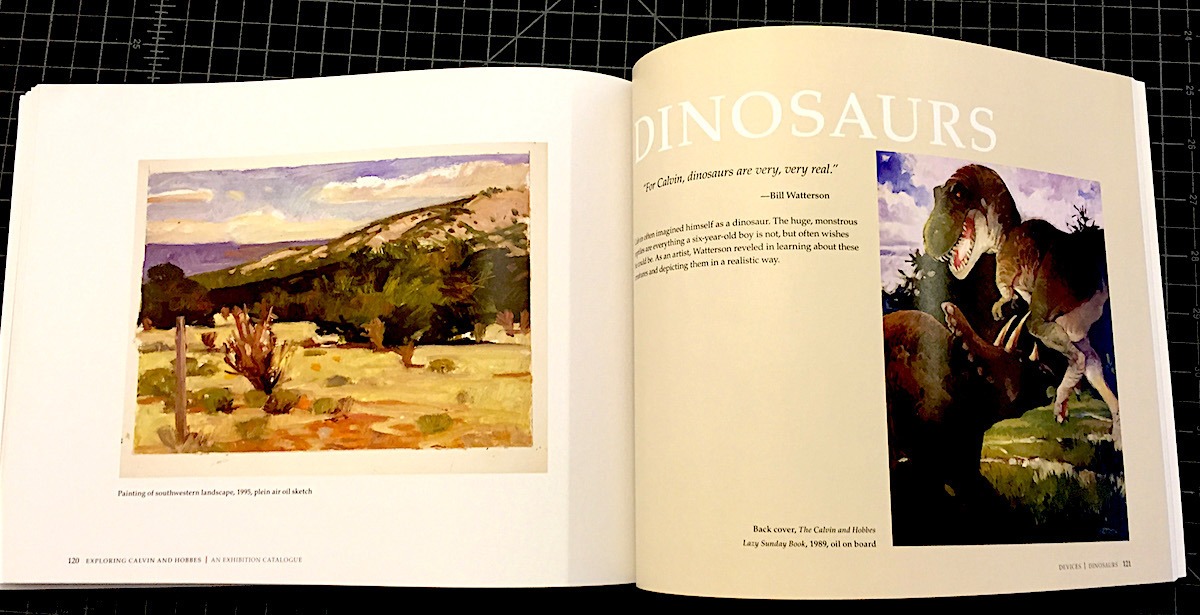

Exploring Calvin and Hobbes: An Exhibition Catalogue
by Bill Watterson and Robb Jenny
Andrews McMeel Publishing
2016, 160 pages, 8.5 x 11 x 0.6 inches
I like many grew up on Calvin and Hobbes. I don’t know if there’s a comic, book, film, or any other piece of art that better captures a childhood. I read every Sunday strip, most of the dailies, and the ones that I missed I would read in dog-eared collection books checked out from the library. As I got older, I wanted to know more about the strip’s creation. When I picked up the Complete Calvin and Hobbes, a 14-pound tomb, I was a little disappointed. Other than an introduction, there was very little information about the mysterious creator Bill Watterson. Thankfully, Exploring Calvin and Hobbes: An Exhibition Catalogue makes up for that.
This is the Blu-Ray extras that Calvin & Hobbes fans have been waiting for. It’s not for those casually interested in reading the strip. There are plenty of other books for that. But if you’re interested in process, history, and the inspiration behind a boy and his tiger, you’re going to love this book.
The book explores an exhibit of Watterson’s work at the Billy Ireland Cartoon Museum. It also includes one of the most in-depth interviews he’s ever given. In it you get a rare look at his early work, the tools Watterson used, the struggles he went through, and the wonderful comic that he created. You get a real sense of the artistry that Watterson put into the strip, and how it evolved over the years. It’s great to relive and learn about something that had such an influence on me. This book is definitely a must-have for Calvin and Hobbes fans. – JP LeRoux
Books That Belong On Paper first appeared on the web as Wink Books and was edited by Carla Sinclair. Sign up here to get the issues a week early in your inbox.
06/2/26ALL REVIEWS
 05/31/26
Life in ancient times / Desperate Oasis / Theatrical releases you can stream
Recomendo – issue #516
 05/29/26
Book Freak #211: Tolstoy’s Guide to Daily Wisdom
Leo Tolstoy’s Daily Thoughts to Nourish the Soul

EDITOR'S FAVORITES
COOL TOOLS SHOW PODCAST
WHAT'S IN MY BAG?
03 June 2026
ABOUT COOL TOOLS
Cool Tools is a web site which recommends the best/cheapest tools available. Tools are defined broadly as anything that can be useful. This includes hand tools, machines, books, software, gadgets, websites, maps, and even ideas. All reviews are positive raves written by real users. We don’t bother with negative reviews because our intent is to only offer the best.
One new tool is posted each weekday. Cool Tools does NOT sell anything. The site provides prices and convenient sources for readers to purchase items.
When Amazon.com is listed as a source (which it often is because of its prices and convenience) Cool Tools receives a fractional fee from Amazon if items are purchased at Amazon on that visit. Cool Tools also earns revenue from Google ads, although we have no foreknowledge nor much control of which ads will appear.
We recently posted a short history of Cool Tools which included current stats as of April 2008. This explains both the genesis of this site, and the tools we use to operate it.
 Kevin Kelly started Cool Tools in 2000 as an email list, then as a blog since 2003. He edited all reviews through 2006. He writes the occasional review, oversees the design and editorial direction of this site, and made a book version of Cool Tools. If you have a question about the website in general his email is kk {at} kk.org.
 Mark Frauenfelder edits Cool Tools and develops editorial projects for Cool Tools Lab, LLC. If you’d like to submit a review, email him at editor {at} cool-tools.org (or use the Submit a Tool form).
 Claudia Dawson runs the Cool Tool website, posting items daily, maintaining software, measuring analytics, managing ads, and in general keeping the site alive. If you have a concern about the operation or status of this site contact her email is claudia {at} cool-tools.org.


