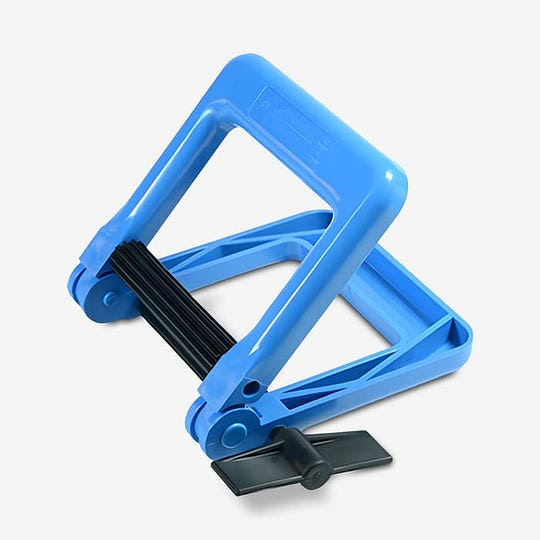
July 2008
CliC Readers

For anyone requiring reading glasses intermittently, these specs are heaven sent! The frame breaks in the front and clicks together once resting on your nose by way of two magnets. When not in use, they stay out of the way -- the glasses have a hard frame 'loop' that slips around your neck. As soon as you need them, you reach down and pull them up into place. I've tried lanyards -- they get caught on your seat belt strap and tangeled around your collar. I've tried my pocket -- they fall out. Nothing seemed to work, so I ended up buying eight or ten pair of cheap glasses and leaving them all over: habitat, car, at work, etc. CliCs are a wonderful way to avoid all that clutter.
-- Dennis Brittain
CliC Readers
$29
Available from Amazon
Manufactured by CliC

CliC also makes goggles that look promising. If you have any experience with the goggles and can report negatively or positively, please let us know. --sl
Clearblue Fertility Monitor

This fertility monitor is designed to predict ovulation and optimize a couple's chances of conception. It requires test sticks which are used at the onset of a woman's menstruation to monitor urine once daily (best in the AM). The urine is applied to the test stick which is inserted into the monitor. When ovulation is at its peak, the monitor shows a dot within a circle. We referred to this as the "egg's in the basket." My wife and I had tried for quite some time to have a second child. Our firstborn son was conceived in vitro, and the second time around we paid for two attempts at a cost of approximately $16,000 -- both failed. Just as we started to save up money to try again, we stumbled across the fertility monitor (it cost $250 when we bought it six years ago). We thought we'd just keep trying with the monitor until we'd saved enough for another in vitro attempt. To our surprise, the monitor worked on only the second attempt using it. Much quicker than when we had our son. I'm pretty sure it would have worked on the first attempt, but at the time we actually didn't believe the readings were accurate. It showed my wife ovulating extremely late in her cycle. News to us! There are now monitors available that don't require test sticks ($50-60/pack). This one's still the best purchase we've ever made. The average cost for an in vitro attempt is $12,000 to $16,000, which was not covered under our medical plan. The first attempt is the most expensive and subsequent attempts can be less expensive depending on the number of embryos available from the first attempt. We had four embryos remaining and if we paid for that treatment, it would have run around $6,000. The unit saved us roughly $5,750, which was a blessing, but needless to say, the birth of our daughter using this monitor is one of the greatest joys in my life. We have since loaned our monitor to four other couples that were having trouble conceiving. All four mothers got pregnant -- interestingly, all with girls.

-- Jeff Cruz
Clearblue Fertility Monitor
$150
Available from Amazon
Manufactured by Inverness Medical, Inc.
Strap-A-Handle

I picked up my first Strap-A-Handle while helping my brother move into his dorm room. Before we got started, I saw these for sale outside his building. It's an adjustable strap rated for 50-lb loads with a comfortable, built-in handle on top. It helped eliminate numerous trips to and from our car, and allowed me to walk up the four flights of stairs and navigate his winding hallways with ease. You just wrap it around the box(es), clip it and go. It's more expensive than DIY Box Handles, but obviously, it requires no assembly and can be reused. I let my brother keep the one we initially bought, and when I left his dorm I bought two more -- one for my mom to use when shopping to help carry cases of soda and water, and the other one's in the glove compartment of my car. I've since discovered a bunch of ways to use it to help eliminate carrying awkward-shaped items or items in bulk, including a PC tower and beach chairs. I also plan on using it to carry portable grills when I go tailgating this football season. The strap comes in two different sizes -- the standard 6-ft. (which I have) and an XL strap that's 8ft.
-- Brian Donovan
Strap-A-Handle
$13
(6 ft.)
Available from Amazon
$15
(8 ft.)
Also from Amazon
Manufactured by Strap-A-Handle
Best home chemistry lab book

The very best chemistry experiment book for kids is the legendary and long-out-of-print book, the Golden Book of Chemistry Experiments. Published in 1960 during the heyday of home chemistry, it was meant to accompany the millions of chemistry kits that were sold each year to typical American kids. You got real experiments with real chemicals. Not like the so-called chemistry sets today which boldly (and insanely) advertise they contain "No Chemicals!"
Among many other things, the Golden Book of Chemistry Experiments told you how to make chlorine gas from bathroom supplies, hydrogen from flashlight battery parts, and rayon from scrap paper, etc. You can see why it was not reprinted in the decades following because of concerns about safety. I used my copy, which is now worth $200 on eBay, to do all the experiments in the book when I was 12, and went on to build a chem lab in my basement. As many kids did.

Golden Book of Chemistry Experiments, 1960.
You can get a decent free PDF version of the Golden Book on BitTrorrent. Even better, there's a new great book for home-made experiments, updated for today: the Illustrated Guide to Home Chemistry Experiments from the tech publisher O'Reilly. The Illustrated Guide to Home Chemistry Experiments is aimed at home schoolers, high school students, and lifelong-learning adults. It is aptly subtitled "All lab, no lecture"
The Golden Book encouraged playing around with molecules, with no agenda beyond demonstrating the power, principles, and diversity of chemical reactions. The Illustrated Guide on the other hand is a basement laboratory manual meant to teach you the basic working principles of chemistry. How to mix a molar solution. How to titrate. How to do quantitative sleuthing. It claims that if you go through all the chapters you'll be prepared to pass the college-level AP Chem Lab test. You would also be able to work in most laboratories. And of course, you would probably be able to follow most chemistry recipes from the internet, or at least to figure out what you need to make something chemistry-wise.
At the very least, this book should help cure any hysteria you -- or your kids -- might have about CHEMICALS. Sure, they can be dangerous, like your car. But we are surrounded by chemicals, and the only way to understand their real risks is to mess around with them.
Illustrated Guide to Home Chemistry Experiments is a fantastic teacher for chemical literacy. It will show you or your kids how to work with chemicals, and why they are fun. Some of the experiments are visually entertaining. Others are scientifically important. It's got wise advice about the few bits of equipment you'll need for your lab. The Illustrated Guide very handily provides substitutions for ingredients whenever possible, so you can work around harder to acquire or expensive chemicals and gear. And it very conscientiously gives proper disposal instructions for substances at the end (the first I've ever seen in a chem book). The author is thrifty, using no more stuff then necessary, and always suggesting ways to purchase the minimum equipment.
Other than the hidden Golden Book of Chemistry Experiments, there are simply no other decent books for the beginner chemical experimenter. The ones you find in libraries are simply useless trash. The stuff on the internet is haphazard and inconsistent. Follow the instructions here in the Illustrated Guide to Home Chemistry Experiments and you'll be on your way to chemical literacy.
-- KK
Illustrated Guide to Home Chemistry Experiments
Robert Thompson
2008, 432 pages
$20
Available from Amazon
Sample excerpts:

Using a Beral pipette to bring the water mass up to 100.00 g
*
Everyone rightly treats strong acids with great respect, but many students handle strong bases casually. That's a very dangerous practice. Strong bases, such as solutions of sodium hydroxide, can blind you in literally seconds. Treat every chemical as potentially hazardous, and always wear splash goggles.
*
MAINTAINING A LABORATORY NOTEBOOK
A laboratory notebook is a contemporaneous, permanent primary record of the owner's laboratory work. In real-world corporate and industrial chemistry labs, the lab notebook is often a critically important document, for both scientific and legal reasons. The outcome of zillion-dollar patent lawsuits often hinges on the quality, completeness, and credibility of a lab notebook. Many corporations have detailed procedures that must be followed in maintaining and archiving lab notebooks, and some go so far as to have the individual pages of researchers' lab notebooks notarized and imaged on a daily or weekly basis. If you're just starting to learn about chemistry lab work, keeping a detailed lab notebook may seem to be overkill, but it's not.
*
CHEAPER BY THE POUND
Do not overlook the advantages of banding together with other home schoolers or like-minded hobbyists to buy chemicals in bulk. For example. a vendor may charge $3 for 25g of a particular chemical. $5 for lOO g, and $9 for 500 g. If you need only small amounts of chemicals, you may be able to cut your chemical costs dramatically by arranging with other homeschooling families or hobbyists to order chemicals in larger quantities and divide them among you.
The cost advantage is particularly great for chemicals that incur hazardous shipping surcharges. For example, if you order 100 rnL of concentrated nitric acid for $5. the vendor may add a $35 hazardous material shipping surcharge, for a total of $40. But if you order a 500 mL bottle of concentrated nitric acid for $15, the same surcharge applies, for a total of $50. If you divide that chemical with four friends. each of you gets 100 mL of concentrated nitric acid for only $10.
*
MICROSCALE EQUIPMENT
The recent trend in chemistry labs, particularly school and university labs, is to substitute microscale chemistry equipment and procedures for traditional semi-micro or macroscale equivalents. Microscale chemistry, often called microchemistry, is just what it sounds like. Instead of using standard test tubes, beakers, and flasks to work with a few mL to a few hundred mL of solutions, you use miniaturized equipment to work with solution quantities ranging from 20 pL (microliters, where one pL equals 0.001 mL) to a couple mL.
Using microscale equipment and procedures has many advantages. Microscale equipment and procedures are less expensive than standard equipment and procedures, which is a major reason for the popularity of microscale chemistry. Using microscale equipment and procedures means that chemicals are needed in very small quantities, which are safer to work with and easier to dispose of properly. Microscale also makes it economically feasible to do experiments with very expensive chemicals, such as gold, platinum, and palladium salts. Setup and teardown is faster, allowing more time for actual experiments, and cleanup usually requires only rinsing the equipment and setting it aside to dry.
Against these advantages, there are several disadvantages to microscale chemistry. First and foremost, everything is on such a small scale that it can be difficult to see what's going on. For example, you may need a magnifier to examine a precipitate (or even to determine whether there is a precipitate). Because of the small scale, measuring or procedural errors so small that they would have no effect on a traditional scale experiment can greatly affect the outcome of a microscale experiment.
*
PROTECTING WORK SURFACES
Some of the chemicals you work with may stain or otherwise damage wooden or laminate work surfaces. I protect my work surfaces, which are standard kitchen laminate counters, by covering them with rubber nonslip mats that are available in various sizes and thicknesses at craft stores. I also put an old bath towel between the counter top and the rubber mat. The mat provides a smooth. level, chemical-resistant work surface, and the old towel absorbs any liquids that run off the mats.
My advisor. Dr. Mary Chervenak, is an expert on paints and coatings. I asked her and my other advisor. Dr. Paul Jones. if there was any kind of paint that could be used to protect surfaces from most laboratory chemicals. The short answer is "not really." Standard latex, polyurethane, and epoxy-based paints and coatings offer reasonablv good protection against many reagents and solvents. including the dilute reagents used in most of the experiments in this book. However, they offer less (or no) protection against strong acids or bases or some organic solvents.
Still, as Dr. Jones commented, some protection is better than none, and in a sense you can think of these pints as ablative coatings. The coating itself may dissolve in or be eaten away by a strong chemical. but it may protect the underlying surface long enough for you to dilute, mop up, or neutralize the spill. It I used a wooden workbench or a similar surface. I'd put several thick coats of an epoxy-based deck or floor paint on it. and then protect it further with a rubber mat and towel.
Even if you take reasonable precautions and work carefully, it's almost inevitable that at some point you'll spill something nasty on your work surface. That's a good argument for choosing a work surface that's expendable. If you eat holes in a sheet of plywood or particle board, that's cheap and easy to replace. If you eat holes in your washer/ dryer. you may have some explaining to do.
*

Chemical incompatibility matrix
*
WHO THIS BOOK IS FOR
This book is for anyone, from responsible teenagers to adults, who wants to learn about chemistry by doing real, hands-on laboratory experiments.
DIY hobbyists and science enthusiasts can use this book to master all of the essential practical skills and fundamental knowledge needed to pursue chemistry as a lifelong hobby. Home school students and public school students whose schools offer only lecture-based chemistry courses can use this book to gain practical experience in real laboratory chemistry. A student who completes all of the laboratories in this book has done the equivalent of two full years of high school chemistry lab work or a first-year college general chemistry laboratory course.
And, finally, a word about who this book is not for. If you want to make fireworks and explosives-or perhaps we should say if all you want to make is fireworks and explosives-this book is not for you.
Bemis Easy-Clean Toilet Seat

This toilet seat's plastic hinges are equipped with seat anchors that allow the seat to be removed for toilet cleaning. A simple twist of two locking knobs and the seat lifts off; reversing the procedure re-locks the seat. It makes an awkward job very simple. My toilet is so much easier to clean completely. The area around the hinges is much cleaner due to easier access. Still one of the best ideas for the bathroom I've ever seen. There are various colors and incarnations on Amazon that cost more than $30. I purchased the cheapest basic style at the local Home Depot for less than $12.
-- Lester Coats
Bemis Easy Clean Toilet Seat
$9 (white)
Available from Amazon
$18 (black)
Also available from Amazon
$20 (blue)
Also available from Amazon
Manufactured by Bemis
NOTE: The manufacturer sells Easy Clean seats under the following brand names: Church, Mayfair and Westport. Also, I think it's worth saying that although we're recommending this product, I'm personally not thrilled with the manufacturer's "what women want" slogan. -- sl
Sleeptracker Pro
![]()
As a frequent traveler and someone who has a hard time sleeping in strange hotels, I live with a recipe for many sleepless nights. Seems like the alarm always goes off just when I have just fallen asleep. To help me get a good read on my sleep patterns and to get more restful sleep, I bought the Sleeptracker Pro, a wrist watch that monitors your sleep cycle from barely asleep to REM by tracking a succession of small bodily movements. You set the alarm for, say, 6:30 am and specify a window of time around that (normally I do 15 minutes on either end of my desired wake up time). Within that window, the watch finds the point at which I'm most awake and wakes me then, as opposed to when I'm out silly. I started using mine about 10 months ago and had success as soon as I first put it to use on a business trip. I'd tried using one of those gentle wake up alarm clocks before, but it was more like an airhorn. The Sleeptracker is far more effective (it cab be set to beep or vibrate), plus it's on your wrist so you don't have to remember to pack it. The set up was simple, too. I now find the watch especially useful for when I am traveling across time zones, since it helps me get a more restful sleep. The watch also monitors your sleep pattern over time and you can download the data to your PC to see the trends, which helps to spec out the optimal window you'll need to wake up.
-- Dan Tushinski
Sleeptracker Pro
$164
Available from Amazon
Manufactured by Innovative Sleep Solutions
Benjamin Moore Aura Paint

When my husband and I moved into our new apartment recently, we knew a coat of fresh paint would spiff up the place, but with a new baby we wanted to pay special attention to the kind of paint we used. Unlike a lot of VOC-free paints (VOC = volatile organic compounds), Benjamin Moore's Aura line of low-VOC acrylic paints isn't thin or runny, dries really fast (literally an hour or less) and it's available in a satisfying array of colors in eggshell, matte, satin, and semi-gloss. It's VOC rating is less than 50 grams per liter (a standard paint might have 250 grams; VOC-free paints can still have up to 5 grams per liter). The Aura paint isn't cheap -- I think we spent $10-15 more per gallon than we normally do -- but I have always been partial to more expensive paints because the colors appear truer and, in many cases, they require just one coat. With Aura, we found even the deepest of wall colors only required two coats to cover, and we didn't use primer. The best part is there was no stinky paint smell residue, only beautifully-painted walls to gaze at with our little one.
-- Amanda Hughes-Watkins
Benjamin Moore Aura Paint
$55
(1 gallon)
Available from Moores Hardware
Or search for a retailer via zip code (top right)
Manufactured by Benjamin Moore
IKEA Frost Drying Rack

Drying clothing on a rack is cheaper and better for the environment than using a dryer, but the design of a lot of drying racks is far from ideal. IKEA's Frost rack is a long series of bars that are horizontally parallel to one another, which maximizes the use for each bar. The closely-spaced bars allow me either to pack in small laundry or put sweaters and thicker laundry across two or more bars to let more air pass around it. On the other hand, many racks are situated with each bar immediately above or below another bar, so if you hang pants from the top bar, they hang down making all of the bars below them useless (i.e. wet). A few companies make potentially-good racks you hang from the ceiling, but they're usually permanent, more expensive and not so nice to look at. The cheap Frost rack can easily fit an entire load of laundry, whether it's socks or jeans, and it folds into a large, flat rectangle when not in use. A few racks can easily fit into the back of the closet.
I bought my first Frost rack when I lived in an apartment. But even when my wife and I moved into a house two years ago, we decided to get by without a dryer for a while, mainly to save money. To our surprise, it wasn't difficult. It's no problem at all in the summer, when we can supplement our drying with an outside clothesline on sunny days. During the winter, our two racks are in constant use (hint: put the rack beside or above heating vents or radiators to speed drying). We might eventually buy a dryer, but only to make it easier to catch up when we fall behind. I've been using one rack for about four years and bought the second about two years ago. I cannot tell which is the old one. They've held up quite well. Granted the rack is not perfect: it could be both wider and higher -- tall people will have to stoop a little bit to use it. Still, it's far better than any of the alternatives I've found.
One unexpected benefit: our clothing seems to last a lot longer. We'd never realized how rough the dryer can be on clothing. I have shirts that are a few years old I wear regularly and they still look new. I suppose all of the lint in the dryer trap has to come from somewhere.
-- Willie Beegle
$20
Available from IKEA
NEOS Overshoes

NEOS (New England Overshoes) are basically big insulated, gusseted bags with soles. They fit over my hiking boots, sneakers or, if it's just a quick errand outdoors, my socks. The gusset folds over the top of the foot and ankle with a hook and loop (Velcro) closure. A strap across the instep makes for a snug, secure fit. I discovered NEOS a couple of years ago working as a film extra in rural Pennsylvania. We were outside in cold, wet snowy weather all late fall and early winter. Several members of the crew wore them and the wardrobe folks used them to keep the principle actor's shoes out of the mud and slush. Insulated and uninsulated models are rated for temperatures as low as -20F and 0F respectively. I chose the insulated Explorer version, because I often work and play outside during the winter. As a Scoutmaster, I have worn mine on snowy weekend camping trips when temperatures are down in the teens and kept my feet warm and dry. Last winter ('07-'08) was pretty mild, so I didn't wear them as much, but after two years the NEOS are as good as new. The choices have expanded quite a bit since I bought mine. NEOS also makes light, ankle-high models for commuters with a lining that actually shines dress shoes and heavier expedition weight models suited for intense outdoor activities.
-- Clarke Green
I reappropriated a pair of these boots when my son needed an operation on each leg, requiring recovery in a cast for more than six weeks (one leg at a time). I bought a pair of the NEOS over shoes that fit over my shoes, and it so happened they fit over my son's cast(s) as well. This allowed him to go out during the winter. He could walk to the bus stop, go sledding, etc. It really took some of the suffering out of his recovery, because he could lead a more normal, active life.
-- Alan Brandon

Available from Amazon
Kayaks You Can Build

I have built several simple fiberglass canoes and repaired my sailboats, but using this book I was able to build my first "real," high-performance boat, a Pygmy Coho, a stitch and glue plywood construction sea kayak which was also reviewed in Cool Tools. I read a lot of books on kayak construction, stitch and glue type in particular. I also used the Coho building manual from Pygmy some. But I absolutely would not have been as successful with my boat had I not read this book before building and referenced it during building. The detail, sharing of practical experience, the tons of photos, clarity in explanation and the examples of the exact same boat -- the Coho -- made this the only choice. The book lays out everything in terms of what you can expect to accomplish on Day 1, Day 2 and so forth. Even if you don't follow it step by step, the book provides the fundamentals to make good alternative building decisions.
I was able to do all of the following alternatives: Rigged up my own plumbing for a built in bilge pump. Added 4-oz glass to the deck for strength. Added the bulkheads to also gain rear deck strength. Doubled the coaming lip for strength and aesthetics. Added in hardwood keys at the coaming spacer joints for strength. Fiberglassed the entire coaming (probably really not necessary). Made my own jigs with hot glue and pop sickle sticks as prealignment tools for bulkheads, seat braces, deck joint, etc.
Above all else, the book explains how to build a very flat, level, elevated worktable with internal/external stations to hold the boat in position. That aspect alone is reason enough to go with this book. I am currently building a skin-on-frame, Greenland style kayak for my wife, but I would re-read this book before building any other stitch and glue boat. I also recommend the Greenland kayak website, Qajaq USA and Guillemont Kayak's boat-building forum, where there is a wealth of information for the construction and use of stitch and glue, strip building and traditional skin-on-frame (SOF) kayaks.
Available from Amazon
In order to achieve professional results, each stage of your work should be completed with the least number of steps as well as prepare you for the next stage. For example, if you apply the filler casually with a stick, before the next step can happen the excess will have to be sanded off. Professionals eliminate the cleanup step by placing just enough filler in the right place to do the job. When the masking tape is peeled off, the step is complete and ready for the next one. Keeping the filler under control saves time and minimizes exposure to the bad stuff. That's a pretty fair payoff, but there's also a bonus that comes with thinking lazy. That bonus is professional results. You cannot build a professional-quality boat when you are doing damage control between each step... We are all good at something; by combining an understanding of what needs to be done with what is already familiar, we find that practical solutions present themselves.
*
The less epoxy you put on, the less you have to sand off. If the epoxy is kept under control when wet, expect about one day of sanding, preferably outside. Tidy glue application brings the additional benefits of less unhealthy dust produced and more efficient -- and less costly -- use of the epoxy.
SpeediBleed

This light, portable pressure brake bleeder is the best one I have ever used in the 25+ years I have been working on cars. I have used other professional-style pressure bleeders costing $800-1000 and prefer the SpeediBleed. Using SpeediBleed by myself, it's taken me only 15 minutes to do a 4-wheel brake bleed and, when finished, I had a firm brake pedal and clean brake fluid from top to bottom. The cool aspect of this kit is that you pressurize the master cylinder by connecting the SpeediBleed fluid bottle to a tire with a aluminum machined adapter. Yes, you read correctly; you use a tire to bleed brakes! When I told a few friends of this feature, they jokingly claimed I would have 4 flat tires to show for my work. They could not have been more wrong. The 4-wheel brake bleed of my Cavalier resulted in only 3 psi being removed from the single tire I used.
There are cheaper DIY kits. The Motive looks to be a decent, popular product. Personally, aside from the quality and ease with which you can control the working pressure, I like that the SpeediBleed has a much larger and constant air pressure source. My truck tires are probably 15-20 times larger volume than the Motive's pressure bottle. Thus, I can set the regulator to 20-25 psi and have enough pressure to flush the system, versus having to pump a bottle a few times. And for the extra money, you get a high quality pressure regulator, quick release coupler, the aluminum adapter, and tool case. My buddy knew the old service manager at the local Porsche dealership near me. They have four to five SpeediBleed kits in their shop and are flushing Porsche and Land Rovers every day. I have used mine hundreds of times in the last 12 years. Really makes it possible for any DIY'er to bleed brakes without the headache.
-- Ron Armstrong
SpeediBleed
$120
Available from Hi-Lo Distributors
Bod-i-Bag

This fleece sleeping bag liner looks like a really long hooded sweatshirt, except it has a drawstring base. You can tuck your feet in and close it up, but then wear it to get out of your bag at night to go pee or whatever. I got mine to combine with my Bivanorak bivvy bag to make a lightweight sleeping system, but it also does double duty as a garment that's very nice for sitting around and just keeping warm around camp. I've used it up in the mountains at about 8,500 feet with the temp down to about 38 F. It's light and packs up very small (mine is 9x15 and maybe 2 lbs), and is available with a stuff sack.
Most importantly, they will custom make one for you if, say, you are very tall (I'm 6'10" and 260 lbs). You can also choose from a few fabric thicknesses and add a pocket pouch. I opted for the thickest weight fabric with the pocket pouch, which has a zippered mesh compartment. Great service, too. The maker got my special order to me in 4 days.
-- Randall Robinson
Bod-i-Bag
$64
(lightest fleece w/long sleeve version)
Available from Alpinlite
MacKissic Mighty Mac Chipper Shredder

I bought a Mighty Mac shredder/chipper about 25 years ago, have used it -- heavily at times -- all these years and, with a few engine repairs and turning the shredder blades around once (they are 2-sided), it's worked flawlessly on our 1/2-acre homestead. This is a "hammermill" chipper with free-swinging hammer blades for the top-feed hopper, as well as a chipper, a side feed where you put in larger branches (it will grind up a 2x4) at a 90-degree angle to the balanced flywheel blade that runs on the same axle as the shredder blades. If you get one of the bigger professional type units you don't need a separate grinder, but for home-style operation, I wouldn't fool with any of the lower-cost feed-it-in-the-top units. You don't really need to shred stuff like oak leaves (they compost nicely as is), and the smaller shredders tend to choke on stuff such as 1-incg diameter branches. This unit has changeable screens so you can adjust from fine to coarse output.
Be aware: these are dangerous tools. If you get careless and push down on brush in the hopper and get a sleeve caught in the blades, you'll end up with a mangled (or no) hand. See the simple 2x4 pusher tool below for pushing stuck vegetation into the blades. I also use a Collins machete for chopping up branches for easy feeding and of course -- Grandma speaking here -- goggles (chips fly), earphones, and gloves.
Mine (depicted above) has a 7HP Briggs and Stratton motor. The current models have a 10 HP. I wouldn't bother with the electric starter; the rope pull works fine.
-- Lloyd Kahn
MacKissic Mighty Mac Chipper Shredder - 12PT10
$1900 (includes shipping)
Available from The Lawnmower Shop
Manufactured by MacKissic

Pusher safety tool made from 2X4: cross piece an inch or so narrower than hopper's bottom opening (9-1/2"), screwed on to a 21" handle
CETMAracks

I don't own a car, so when I go to the store for large quantities of beer or buckets of cat litter I use the CETMA, a lightweight steel rack that's tough as nails. I know a couple messengers that have crashed and the rack took the brunt of the force dishing it out to car doors or whatever obstacle happened to be there, and the rack only absorbed a slight crinkle or bend without compromising anything at all in it's performance. I've been using a CETMArack for a couple years and currently have a 5-rail on my '81 single speed, all-weather utility grocery coffee shop beer bike (a 3-rail is plenty big enough if you only plan an occasional twelve pack or a couple library books; they also offer a 7-rail version!). Keeping the load up front over the front wheel lets you control the weight a bit more and doesn't bog down like a rear rack. You cannot ride like you normally would, hopping curbs or diving into corners when you have 27 pounds of cat litter on the front. But it's good to get a change of pace once in a while; a gravity reminder keeps you humble. I also like CETMAracks because of the guy who makes them. Made by hand in Eugene, OR. No outsourcing. No overseas production. And now they even include home-baked cookies with your order.
-- Mark Pilder

CETMAracks
5-rail
$100 (uncoated - bare metal)
$120 (powder-coated)
Available from CETMAcargo
Also available:
7-rail
$120 (uncoated - bare metal)
$140 (powder-coated)

3-rail
$100 (powder-coated)

Scoop Clip

I've seen a few incarnations of the convenient scoop-clip mashup, including a version that's stainless steel. Normally I wouldn't opt for plastic -- especially if I can avoid it -- but this twofer has one unique benefit: two scoops, one tsp. and one tbsp. If I were a baker, I'd use this for flour or sugar. So far, ours remains tethered to the coffee. While my approach to brewing isn't terribly scientific, I'm getting there.
-- Steven Leckart
Scoop Clip
$5
Available from Pampered Chef
Money-Band

Instead of an uncomfortable wallet in my back pocket, I use this rubber band to carry all of my essentials -- credit card, debit card, driver's license, work ID, insurance card. I really was skeptical of spending $3 for a 5-pack* of rubber bands, but I gave it a shot. The bands are a bit shorter than the standard office variety, so you can put one around your credit cards on the narrow end without having to double it over. As is, it provides a snug fit. They're also very tough, about as thick and robust as the kind used on lobster claws. I've been using my original band for the past seven months. My "wallet" can now fit easily in my front pocket at all times with no discomfort.
-- Eric Doherty
Money-Band
$6 (includes shipping)
Available from Money-Band.com
*NOTE: The manufacturer indicated a newer version of the Money-Band is available for $3 for one single band, not a 5-pack. Additionally, the manufacturer indicated the newer vision is a bit thicker little and about 1/8-inch wider.
BodyGlide

As a cyclist and triathlete, I've been a fan of products like Chamois Butt'R for years, but it was only last year I stumbled across BodyGlide in a giant bin in the Triathlon section of SportsBasement. In a matter of weeks, I went from interested to addicted. It's simple stuff you just apply anywhere you have rubbing issues: your netherbits, nipples, wrists, ankles, cankles, armpits or pretty much any other body part prone to chaffing, scraping, or friction. For triathletes, it's great to put on the neck and shoulders to keep your wetsuit from chafing. I also smear it on my wrists and ankles to help me get out of my suit faster in that first transition. I even put it on the outside of my wetsuit at the ankles to make it nice and slippery. Cyclists can use it like chamois butter (although I'm not sure it's good for your chamois like a traditional creme) and for runners it's great for the inner thigh (or if you're prone to bloody nipples. Naturally, it's great for hiking and backpacking as well. There are even versions with sunscreen and analgesics to cover multiple bases. Just don't share it, okay? That's totally grody.
-- Mathew Honan
Body Glide
$15
Available from Amazon
Manufactured by W Sternoff LLC
Black & Decker Accu Mark Level

I've moved three times in four years, but never quite mastered the art of hanging artwork. Move any frame in our home and you'd be likely to find no less than two sets of holes. Well, not any more. At 36", this level seemed like overkill (especially since most everything I hang is in the 8" x 10" realm), but now that I have one, I don't know how I ever got by without it. On either side of the three bubble levels are two 10-inch rulers with sliding "targets." Each target has a t-shape cut out, allowing you to mark exactly where you want the nail(s) to go. More or less fool-proof. It's also incredibly light and easy to maneuver, even with one hand. These days when we buy art, I don't dread the prospect of putting it up.
-- Steven Leckart
Black & Decker Accu Mark Level
$25
(36")
Available from Amazon
Manufactured by Black & Decker
It's All Too Much

I moved to California hauling a lot of boxes still unopened from at least two previous purges of epic proportions. Sound at all familiar?
It's All Too Much is a terrific book that inverts the typical approach to dealing with existential kipple. Rather than helping you find new places and novel ways to "organize" all your crap, author Peter Walsh encourages you to explore why you ever kept all that junk in the first place. Does it reflect a fantasy waistline or a long-abandoned career? What about this "priceless" relic of a late loved one that's been sitting in a moldy trash bag for 10 years? Be honest: what place do these things have in the life that you imagine for yourself? Because, if the stuff you accumulate isn't actively helping get you closer to a life you truly want, then it's getting in the way, and it needs to go. Period.
The biggest change in attitude this book made in my life was to teach me not to generate false relevance by "organizing" stuff I don't want or will never need. Organization is what you do to stuff that you need, want, or love - it's not what you do to get useless stuff out of sight or to manufacture makebelieve meaning. For me, this is about the opposite of organizing; it means disinterring every sarcophagus of crap in my house and, item by item, evaluating whether it's making my family's life better today. And if some heirloom really is precious to me, can I find a better home for it than a shelf in the back of my garage?
You can't believe how emotionally complex this process is for a craphound like me, but once I get started, it's completely exciting - the illusion that all this junk is making me happy melts away with every scrap of paper or broken piece of equipment I can get out of the way.
That's been this book's revelation for me: this is about calculating the very real cost that clutter incurs every day, then deciding what you can tolerate _not_ doing about it. The mindless junk of your past crowds out opportunities and sets pointless limitations. Move out the junk, and you create room for the rest of your life. Ultimately, it's not just a question of tidying your house; it's a question of liberating your heart.
-- Merlin Mann
Merlin Mann's review turned me onto this fantastic book. We've rethought our household because of it. We were reminded that life is not about stuff; it's about possibilities, which the right tools can enable. For a world of expanding stuff, this book is the necessary anti-stuff tool. If you are reading Cool Tools, you need to read this. It will help you distinguish between that which is fabulous for you personally and that which is just more junk to organize. I've learned so much from the author that I've excerpted it generously in the hope that even if you don't read the book, you'll glean a bit of its wisdom.
--KK
It's All Too Much
Peter Walsh
2006, 240 pages
$15
Available from Amazon
Imagine the life you want to live. I cannot think of a sentence that has had more impact on the lives of people I have worked with. ... When clutter fills your home, not only does it block your space, but it also blocks your vision.
*
You need space to live a happy, fruitful life. If you fill up that space with stuff for "the next house," your present life suffers. Stop claiming your house is too small. The amount of space you have cannot be changed -- the amount of stuff you have can.
*
I know it sounds strange, but if you start by focusing on the clutter, you will never get organized. Getting truly organized is rarely about "the stuff."
This is the bottom line: If your stuff and the way it is organized is getting you to your goals... fantastic. But if it's impeding your vision for the the life you want, then why is it in your home? Why is it in your life? Why do you cling to it? For me, this is the only starting point in dealing with clutter.
*
If it's taken you ten years or more to accumulate your mess, it's impossible to make it disappear overnight. Letting go is a learning process. You might need to start slowly, and it may take time to discover that not having things makes your life better, not worse.
*
Most things that you save for the future represent hopes and dreams. But the money, space, and energy you spend trying to create a specific future are wasted. We can't control what tomorrow will bring. Those things we hoard for an imaginary future do little other than limit our possibilities and stunt our growth. When I urge you to get rid of them, I'm not telling you to discard your hopes and dreams. It's actually quite the opposite. Because if you throw out the stuff that does a rather shabby job of representing your hopes and dreams, you actually create room to make dreams come true.
*
It's easy to accumulate things, but hard to let go. Trust me--if you always add and never subtract, you will eventually bury yourself. You need to set limits, and the limits are easy to create. They are determined by the amount of space you have, your priorities and interests, and the agreements you make with other members of your household.
Clutter takes over. One thing that constantly surprises me is that regardless of the amount of clutter in a home, the homeowners often express some surprise at it being there -- almost as though someone filled their home with stuff while they were away on vacation! People freely admit that it is their stuff, but in the next breath they tell me they are confounded by how it got that way.
You own your possessions. What you have is yours, or is in your case. It's your responsibility. It's your doing.
*
Get rid of the trash to make room for the treasures. Let the things that are important take center stage.
*
In my experience, close to half of what fills a kitchen has not seen the light of day in the last twelve months. Face facts: If you haven't used an item in the last year, it is highly unlikely that you really need it or that you are going to ever get enough use from it to justify it cluttering up your home. Take the plunge and get rid of it!
If you're tempted to keep something because it was expensive, remember the difference between value and cost. Value is what something is worth. You spent a lot of money on it. To throw it away would mean admitting that the money was wasted. Now you need to think about the cost. What is it costing you to keep this item? How much space? How much energy?
*
Multi-Use Car Charger

I've been using this multi-use car charger in our older camper van for over a year. With two cigarette lighter ports and two USB ports, it is by far the best auto accessory for us power users and road warriors. It comes configured to plug into an unused cigarette lighter receptacle, but can also be installed with either double sided tape (included) or using removable tabs and screws (included) to permanently mount inside a vehicle. I wired ours directly to the Eurovan's wiring to replace the single cigarette lighter port near the driver's seat. Very heavy duty in construction, it's built like a tank. No heat, no troubles. It's made a great addition to the vehicle, which we use frequently during the summer and winter for multi-day trips. Now we can routinely power up our cell phones, window-mounted TomTom GPS and a laptop (with a 100W max inverter). The USB ports have worked great to power everything we've hooked up to it: iPod, cell phones, Bluetooth kit. While most chargers and inverters I've seen max out at 10 or 15 amps, this one handles 20 amps, which is enough for all four devices to charge at the same time. The total power we pull from this charger when simultaneously charging is maybe 10 amps, but it's great to have the option of using a bigger inverter to pull additional power. This unit also sports a removable 20A fuse on the back panel should anything go awry. The instruction sheet is clear and shows how to wire the unit to your vehicle without too much fuss. At under $20, an awesome deal.
-- Robert Cullinan
Multi-Use Car Charger
$16
Available from Amazon
Werner Combination Step/Extension Ladder

This is the only big ladder I own. It works great as an extension ladder for painting, cleaning the gutters or reaching any of those high places. Like the Little Gorilla, it can be re-configured as a step ladder, so you can use it anywhere there is no wall to lean against. But like the previously-reviewed Green Bull Double Front Ladder, this ladder also has steps on both sides, allowing two painters to work at the same time (the max capacity is 375 lbs). The Werner definitely offers the best of both worlds. More expensive, yes. But surprisingly lightweight for a ladder this strong. I've had mine for more than 10 years with no sign of wear or tear. My dad is still using the one he bought in the '70s.
-- Dan McCulley
Werner Combination Step/Extension Ladder
$322
(8ft.)
Available from Amazon
Manufactured by Werner
Topeak Turbo Morph Bike Pump

The Topeak Turbo Morph is a lightweight frame pump that functions like a floor pump. It has a fold-out anchor for your foot, and the handle also flips sideways into a T-shape. It's also got a hose, so you can easily inflate the tire while it's mounted on the bike. Before getting the Turbo Morph about two years ago, I had a tiny frame pump that was just this side of useless. Most portable bicycle pumps are designed to be used exclusively with your arms/hands. Since they attach directly to the tire, they're cumbersome to use and difficult to get to the full tire pressure. Contrast this to the floor pump in your garage. You anchor it with your feet and use your body weight to power it. Unfortunately, they are also too large to easily carry with you. I tried another "mini foot pump" before the Topeak, but it wouldn't quite work with a Presta adapter. With my other frame pumps, I'd spend more time inflating the tire than I would fixing it, and it would be hard getting the thing past 60 PSI. With this pump, I can get the tire to its full 120 PSI in just a couple of minutes. I have the G model, which has a built-in gauge. More convenient to have a gauge on the pump than to have to carry a separate one. But if you've already got a gauge, then you probably won't want the gauge version. I have puncture-resistant tires, but the key word is "resistant." I still wind up getting a flat a couple times a year. This is well worth carrying.
-- Joe D.

Topeak Turbo Morph Bike Pump
$29
(w/gauge)
Available from Amazon
Manufactured by Topeak
Gamma Seal Lid

This product turns an empty pail into a more useful item: a resealable pail that's strong enough for stacking and sitting. I started using the lids because I just wanted a seat for my fishing pail. It does more than that, though. Keeps everything inside nice and dry (like my camera). And when I'm done, it will seal up the fish I bring home with no fishy water getting out in my car. The lid has two parts: one snaps onto your pail and a gasket seals it tight. The second part is a removable screw in/out center piece also with a gasket for an air- and watertight seal. They fit 3.5 - 7-gallon pails. I happened upon them in the in the livestock section of my local Farm and Fleet store. So far, I have only used mine for fishing. However, I have purchased several more to use for storage around the house. Just need to get the pails. A local pool company sometimes throws out larger buckets, which I'm hoping to reuse.
-- Dave Friese
The Gamma Lid creates a useful object from trash and works with simplicity and perfection. A hammer and a bit of scrap wood can help secure the outer ring onto the rim of the bucket. After that, the inner disc-shaped lid threads neatly onto the outer ring, leaving you with a solid, easy-to-open, waterproof lid that can replace those pry-off tops that shred your fingertips. I have used these for about five years. You can get free, clean, food grade buckets at most large food store bakeries. At present, I store rice and bulk grains in them (a 20-lb. bag of rice fits nicely into a three-gallon bucket). I have also used them as a food bucket for a big wall climb in Yosemite and on river trips to store food. Stunningly simple and effective.
-- John Godino
Gamma Seal Lid
$8
Available from Amazon
$39
(six lids)
Available from Pierce-Ohio
Manufactured by Gamma Plastics

Favorite (15)
